 Feather
Feather 0.14.3
Feather documentation
Feather is a native macOS IDE for working with AI coding assistants: an editor, terminals, source control, an API client, a problems list and a record of what changed, in one small Swift and AppKit app. This page documents every part of it, section by section.
1 · Getting started
Download, install, open a folder
Download
Feather is one disk image, Feather.dmg, about 7.1 MB. It runs on every macOS from 13 Ventura to the latest, 26 Tahoe, on Apple silicon and Intel Macs (one universal app), and is signed with a Developer ID and notarized by Apple, so macOS opens it without a warning. The Liquid Glass chrome appears on macOS 26; earlier versions get the same layout with flat panels. The Download button always fetches the newest version.
Install
- Open the disk image. It opens as an installer window: Feather on the left, your Applications folder on the right, and an arrow between them.
- Drag Feather onto Applications, then eject the disk image.
- Open Feather from Applications. Later versions install themselves (see Updates).
Feather ▸ Install ‘feather’ Command… puts a feather command on your path, so feather . opens the current folder from any terminal and feather src/App.tsx:42 opens a file at a line.
First launch
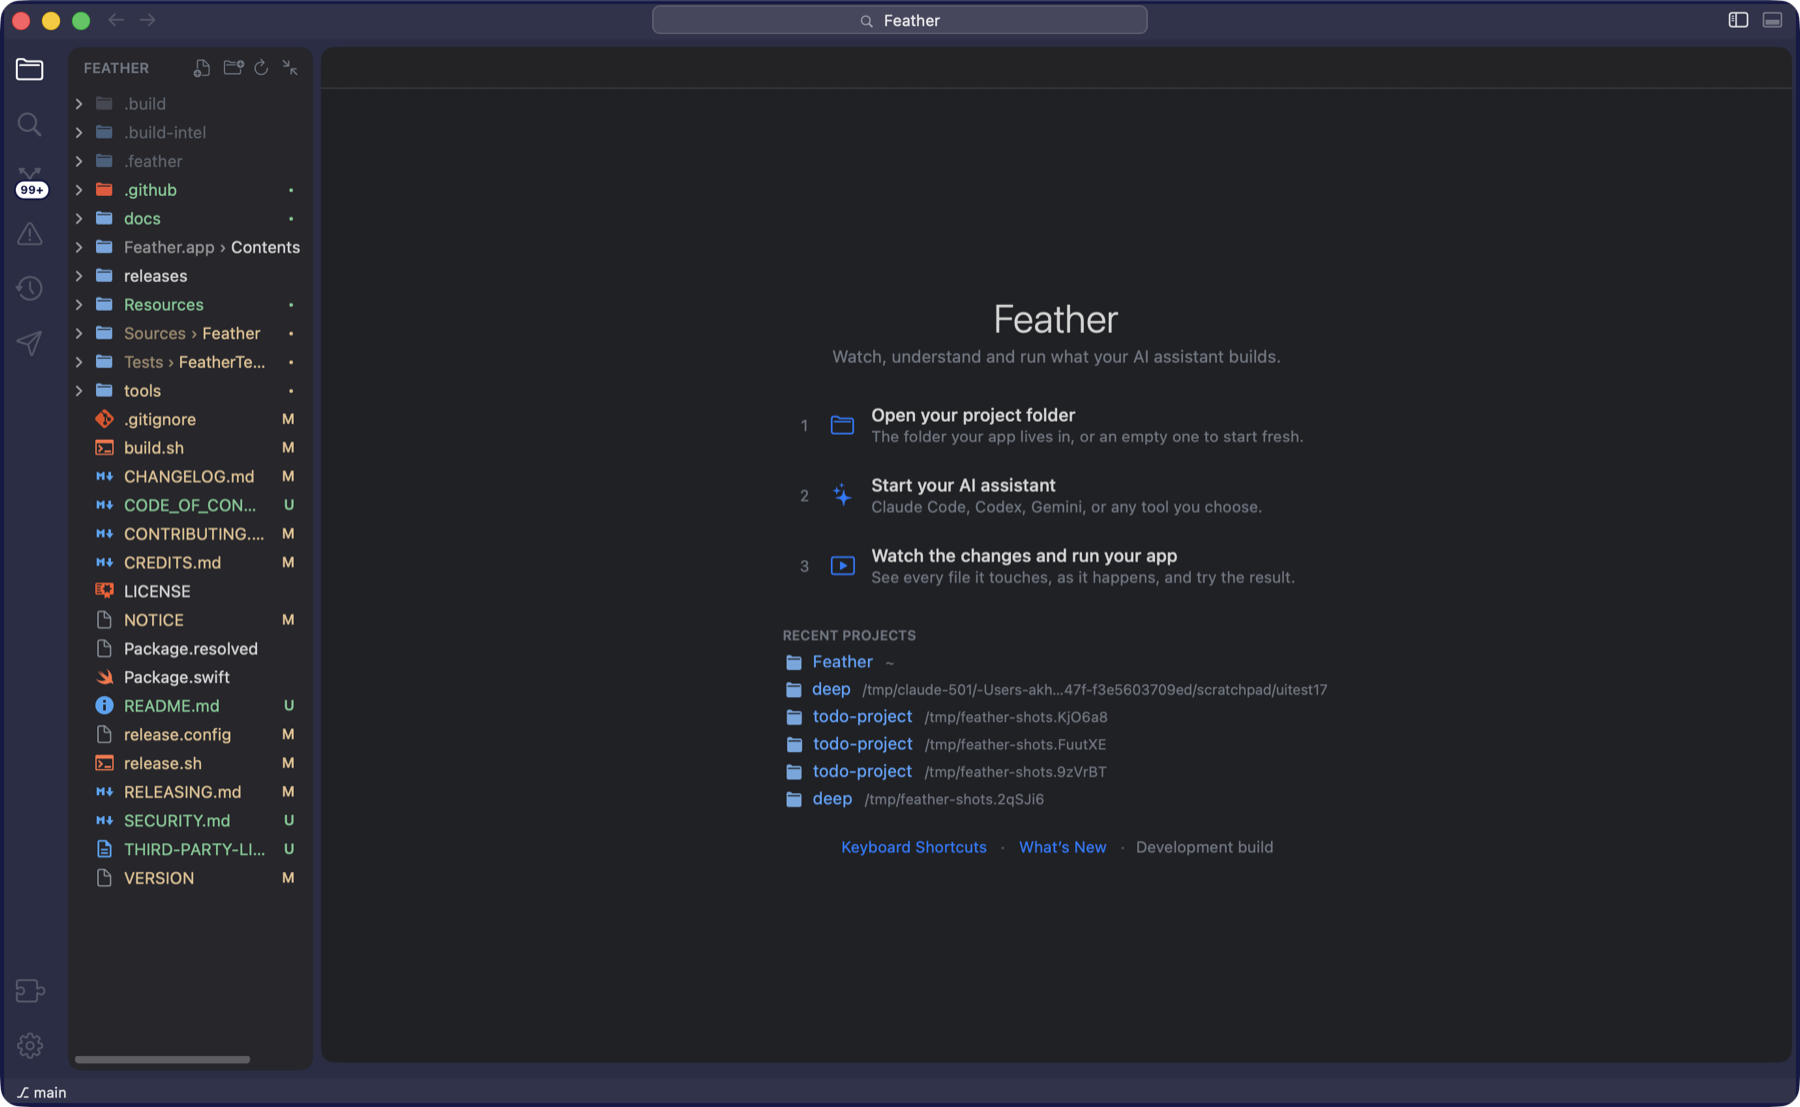
A window with no project shows the welcome page: three steps and your recent projects. Choose Open your project folder or press ⌘ O and pick the folder your code lives in. An empty folder is fine. Windows, tabs, splits and terminals come back the next time Feather starts (Settings ▸ General ▸ Reopen windows, files and terminals on launch).
Folder trust
The first time a folder is opened, Feather asks whether you trust the files in it.
- Trust Folder: everything works. Choose this for your own projects.
- Restricted Mode: you can browse, search and edit, but nothing from the folder is run: no language servers, no error checkers, no Run or tasks, and no git. The status bar shows an orange Restricted Mode label; click it to trust the folder later. File ▸ Manage Folder Trust… lists every decision.
If something goes wrong at launch
- Hold Shift while Feather starts (or run it with
--safe) to open a clean window: the last session and folder are not reopened, and a card says how to get back to normal. - Feather ▸ Reset Feather… (or
Feather --reset) clears settings, saved sessions, checkpoints, API client data, the shell files and caches, then quits. Projects are never touched. - No git on the Mac? Feather looks for the real git (the Command Line Tools, Xcode, then Homebrew on your shell’s path) and never runs Apple’s stub, which would block on an install dialog. Without one, Source Control offers Install Command Line Tools…; everything else works, and the git features fill in by themselves once the tools are there.
Feather sends your code nowhere. It talks to no AI service. It starts the assistant you chose in a terminal, exactly as you would; its only network traffic of its own is the daily check for updates.
2 · The window
Activity bar, sidebar, editor, terminal
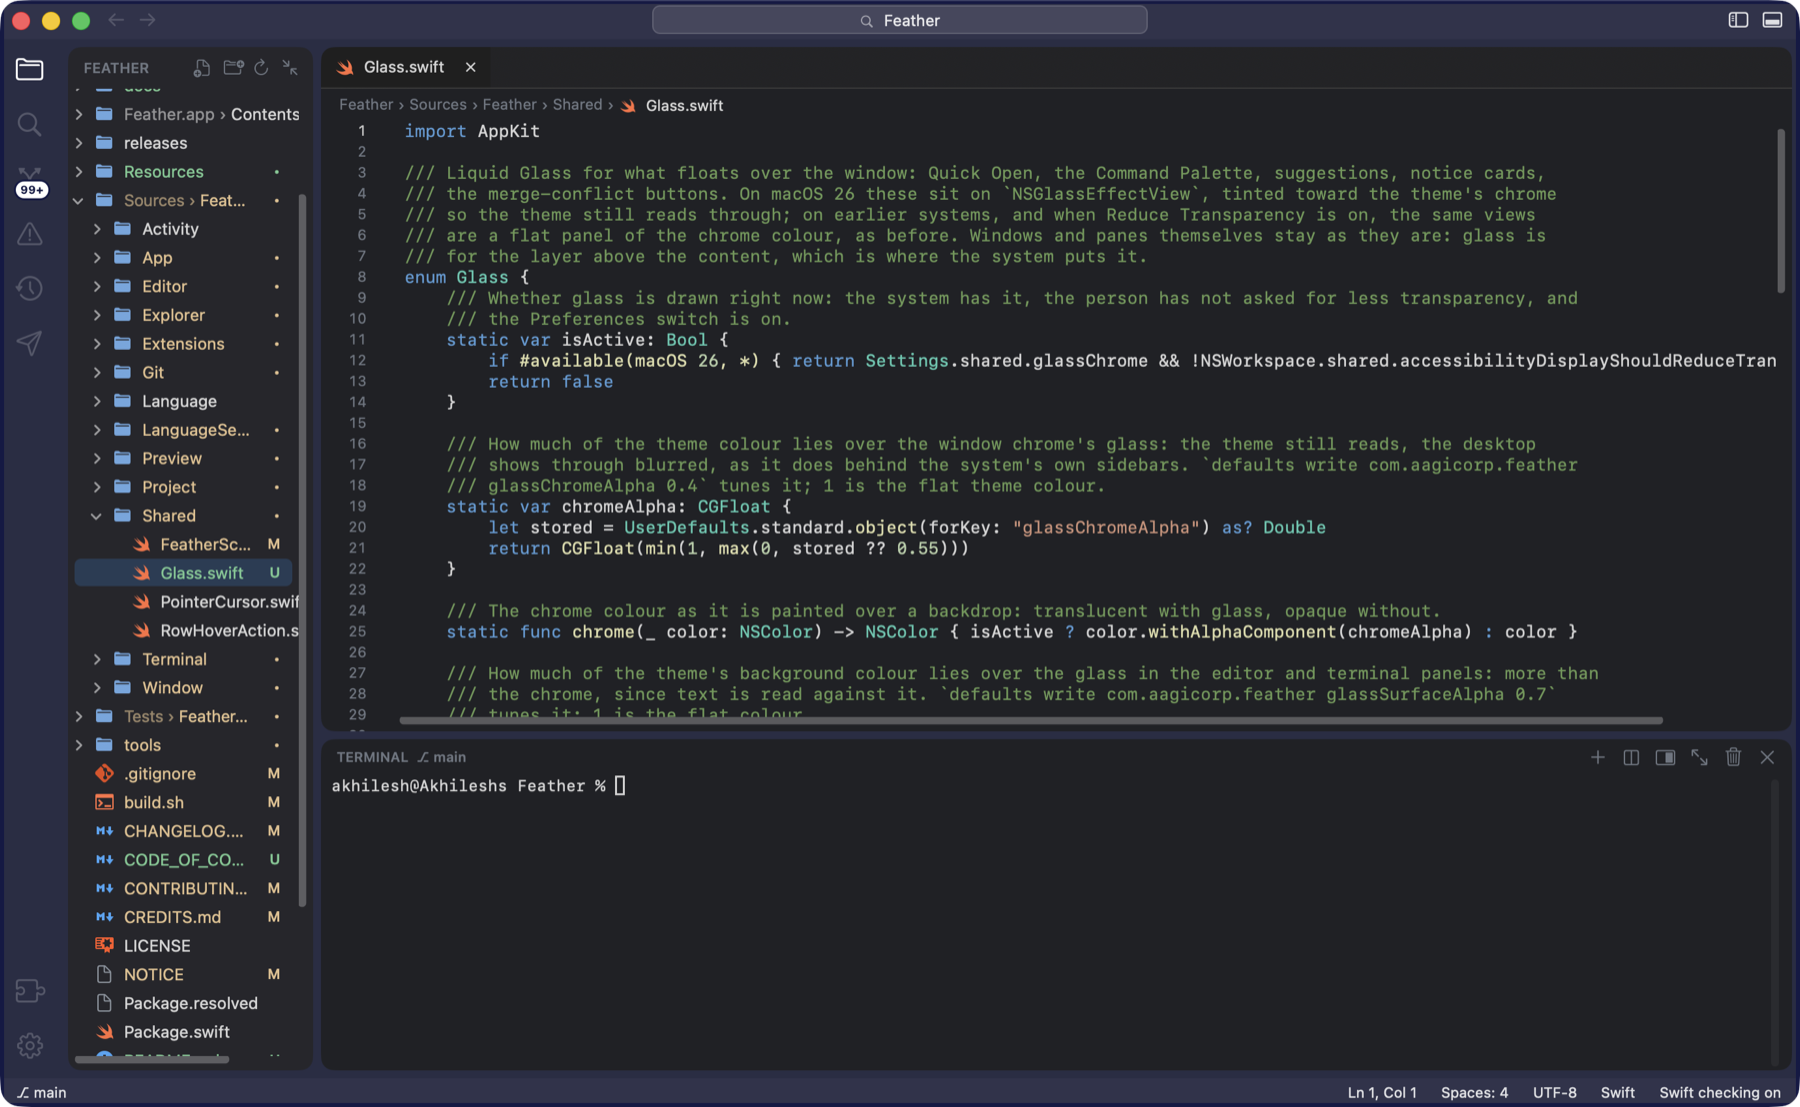
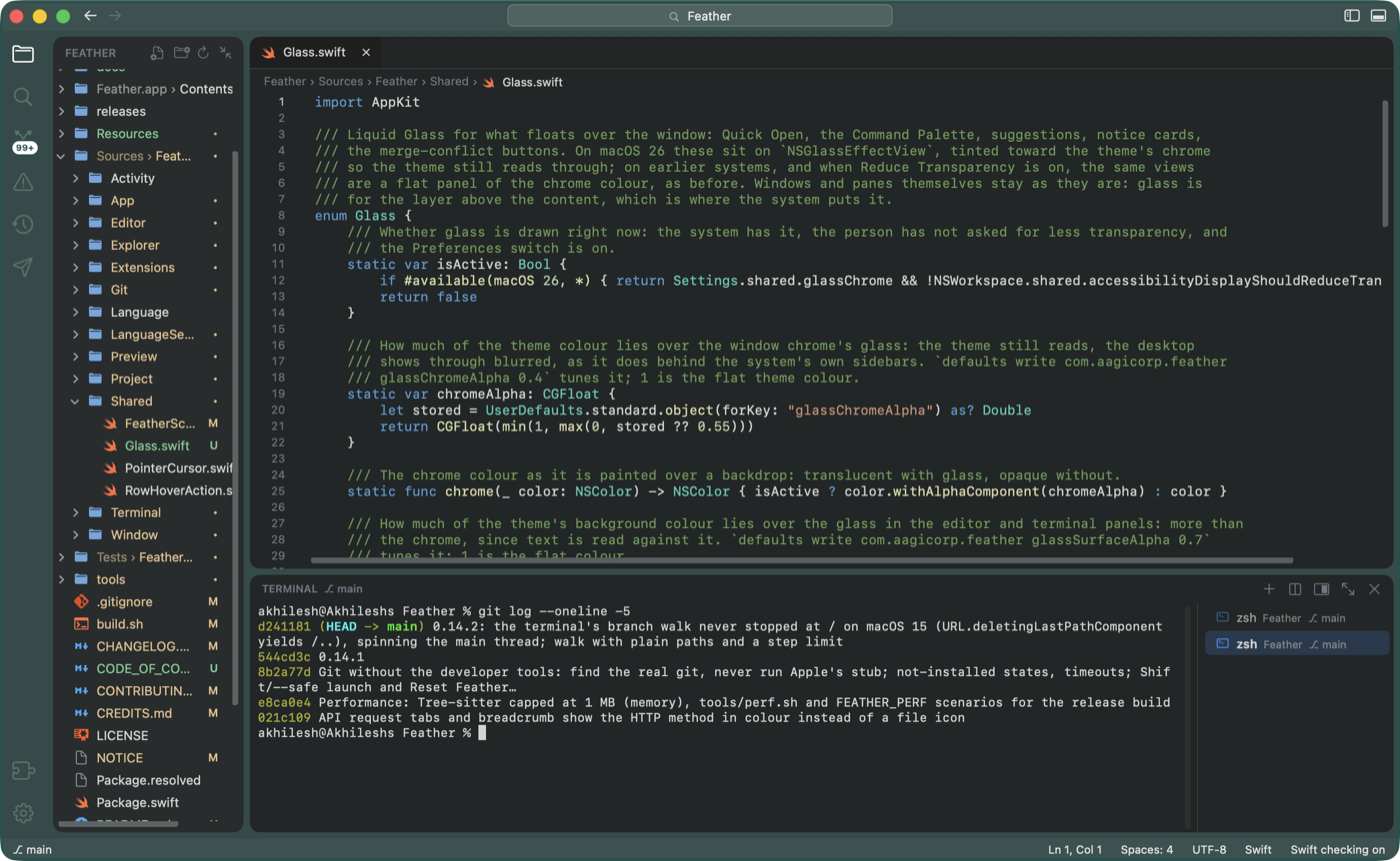
- The activity bar, down the left edge, holds the sidebar’s panes as icons: Explorer, Search, Source Control, Problems, Activity and Requests. Click one to show it; click the lit one to hide the sidebar. The Source Control icon carries the number of changed files. Extensions and Settings sit at the bottom.
- The header holds Back and Forward, the project name (click it, or press ⌘ P, to open a file by name) and two buttons at the right that show and hide the sidebar (⌘ B) and the terminal (⌘ J).
- The sidebar shows the chosen pane. Drag its edge to resize it.
- The editor holds tabs, a breadcrumb path above the text, and can be split side by side (⌘ \). See Editor.
- The terminal panel sits under the editor, or in a tall column on the right (View ▸ Terminal on the Right, or the button in its header). See Terminal.
- The status bar shows the branch with what waits to be pushed or pulled (
⎇ main ↑2 ↓1), the author of the current line (blame), the error and warning counts, the Restricted Mode label, and for the open file the line and column, indentation, encoding, language and whether a language server is checking it.
Glass
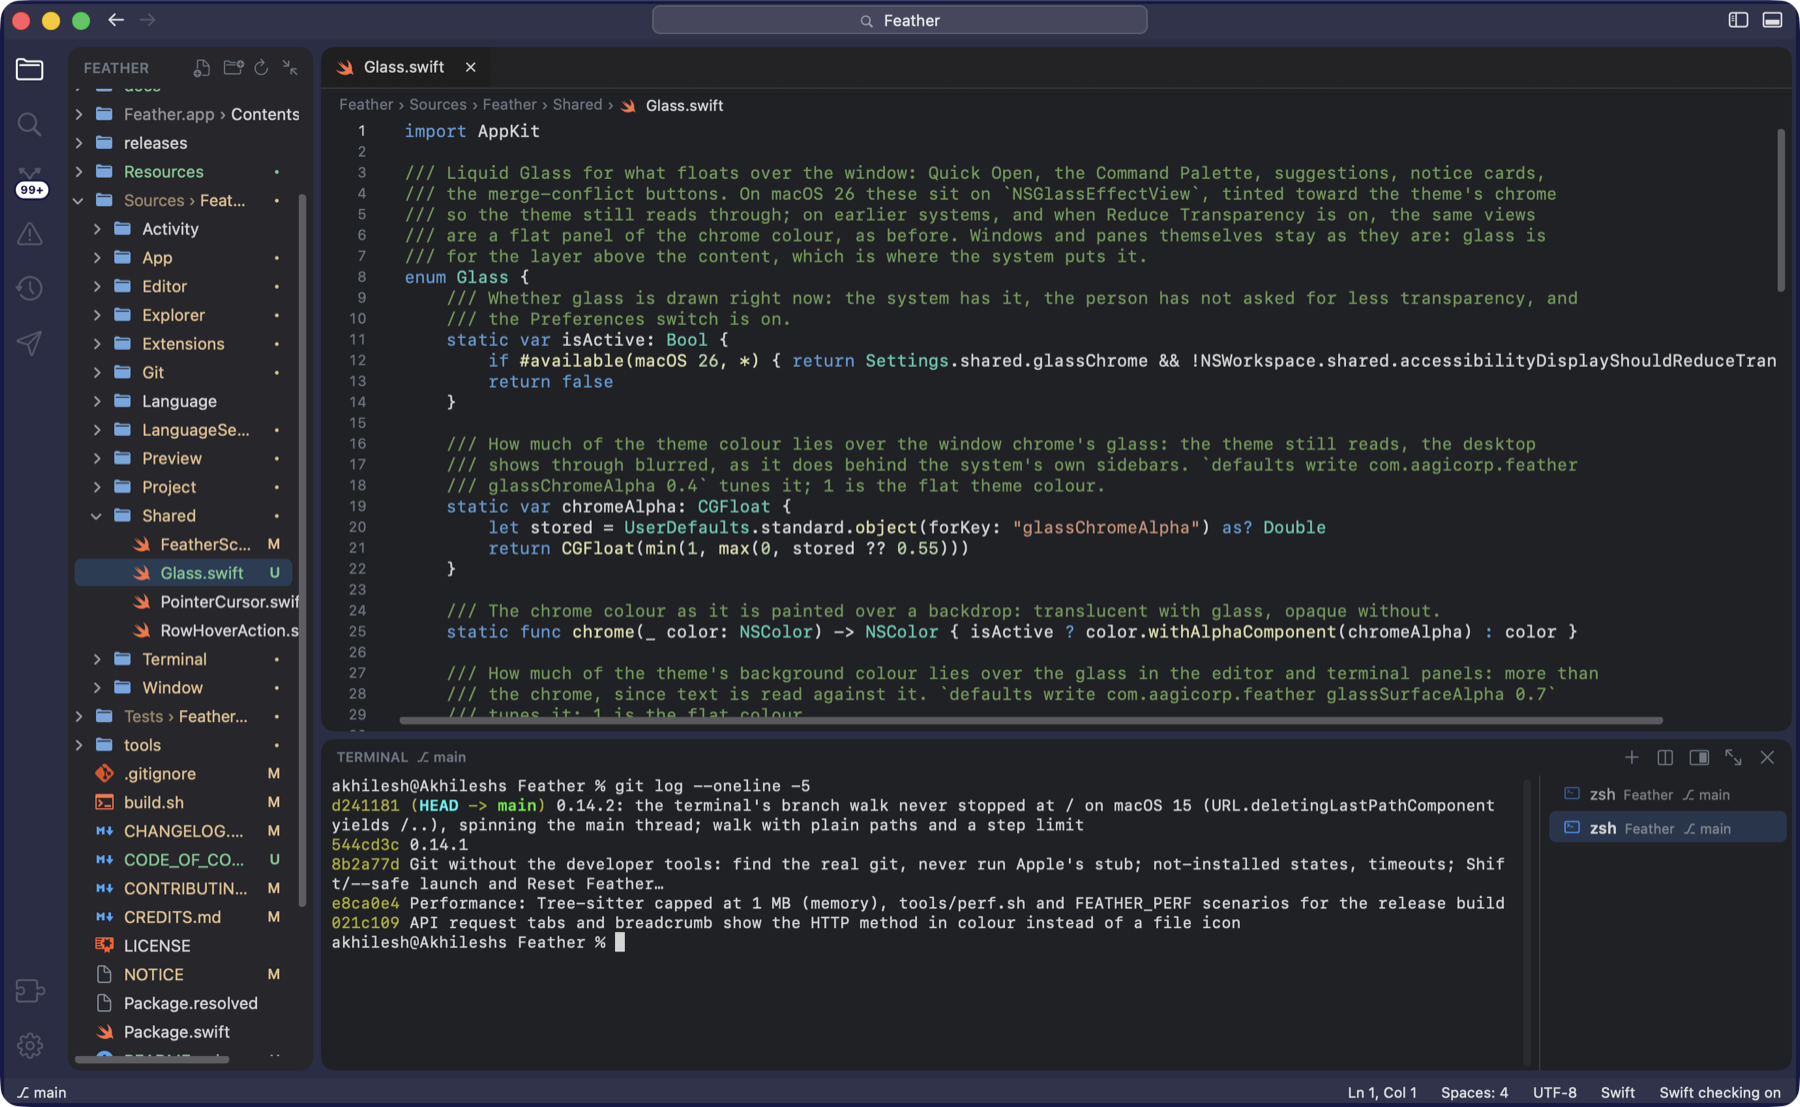
On macOS 26 the window chrome is Liquid Glass: the activity bar, header, status bar and the ground under the panels use the system’s sidebar material, with the theme colour laid over it, so the desktop shows through blurred. The editor and terminal are translucent too, a little less than the sidebar so code stays easy to read. Quick Open, the Command Palette, suggestions, notice cards and the merge-conflict buttons are sheets of glass. On earlier systems, with Reduce Transparency on, or with Settings ▸ General ▸ Glass window chrome switched off, everything is the flat theme colour.
Project colours
View ▸ Project Color gives a project its own colour, dyed into the window chrome (the bars and the ground under the panels) so you can tell windows apart; see Themes and project colour. Pick from the palette or More Colors…, add a Window Border, or choose Use Color from .vscode/settings.json to read the colour VS Code’s Peacock extension set. The colour is kept in .feather/settings.json in the project, which Open Project Settings shows.
3 · Explorer
Files, and what git thinks of them
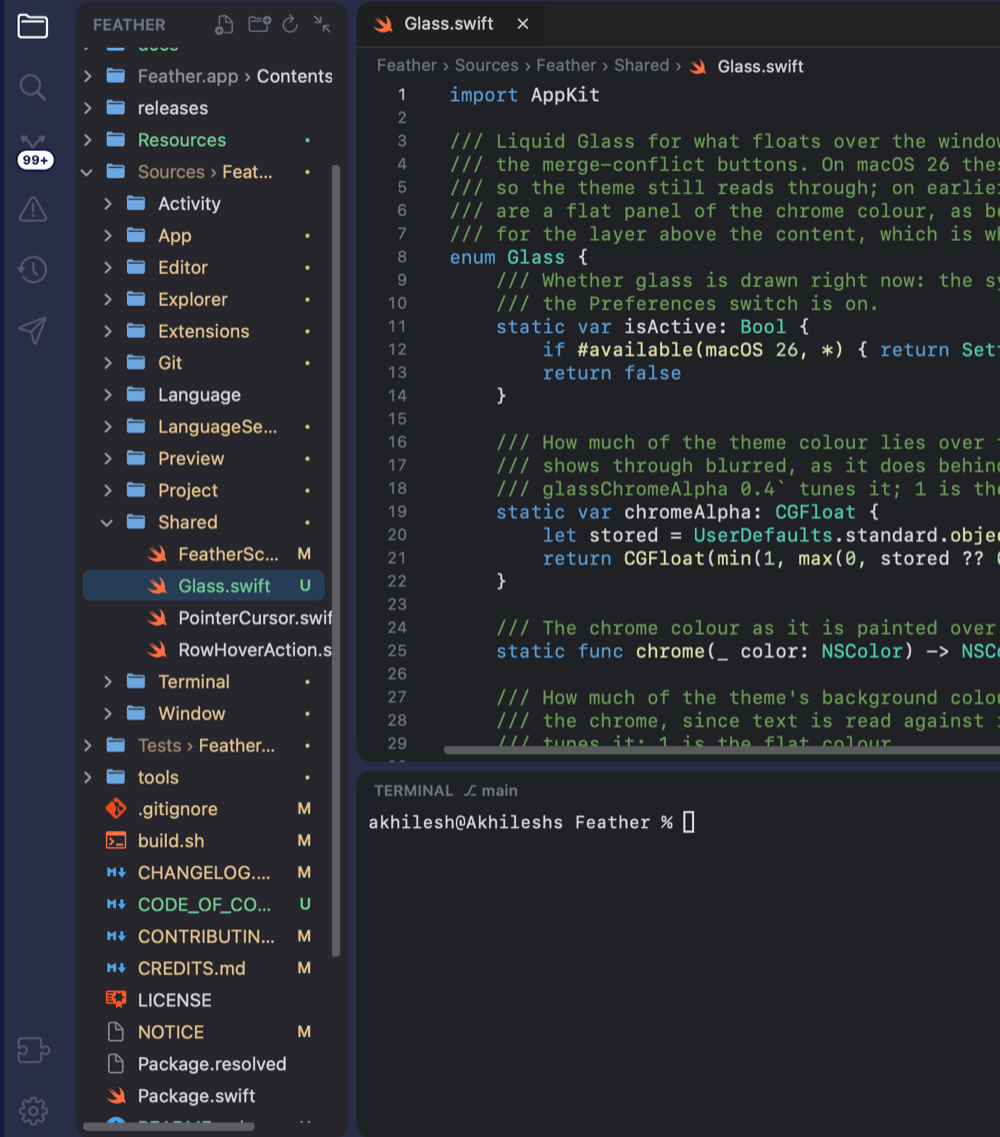
- Git marks. A letter at the end of a changed file’s row, in the matching colour: M modified, U untracked, A added, R renamed, ! conflict. A folder that contains changes gets a dot, green when everything inside is new. The marks are pinned to the visible right edge of the sidebar, in a column of their own, however far the tree is scrolled sideways. Files git ignores are dimmed. The marks follow saves, staging, commits and checkouts on their own, including those made in the terminal.
- Compact folders. Folders that hold nothing but one folder are one row,
src › main › java › com › aagicorp; the folded folders recede and the last one keeps the full colour. A chain too long for the sidebar ends in an ellipsis and the tooltip holds the whole path. Unfold Folder and Fold Folder in the right-click menu open a chain into one row per folder and fold it back. Settings ▸ General ▸ Compact folders turns the folding off. - Sideways scroll. The tree grows to fit its widest row and scrolls sideways when names are wider than the sidebar, so nothing is cut short.
- Rows. One row lights up under the pointer, and the selection is a rounded bar inset from the edges. Rows are laid out by hand, so folders with thousands of files scroll smoothly.
- Buttons at the top: New File, New Folder, Refresh and Collapse All. Names are typed right in the tree: ↩ or F2 renames, Esc cancels, and a name like
components/Button.tsxcreates the folder too. Open tabs follow a renamed file. - Drag a file onto the terminal to paste its path. Settings ▸ General ▸ Reveal the open file in the Explorer keeps the tree in step with the editor.
4 · Search
Find and replace across the project
- Find in Project (⇧ ⌘ F) searches every file in the folder. Results are grouped by file; every match on a line is listed. Click one to open it. Unsaved edits in open files are searched too.
- Options as in VS Code: Match Case (Aa), Match Whole Word (ab) and Use Regular Expression (.*).
- Replace in Project (⇧ ⌘ H, or the chevron beside the search field). In regex mode
$1,$2… stand for the groups. Hover a result for Replace, or a file for Replace All in File. Replace All opens a preview tab first, each file’s lines before and after with a switch to skip a file, and Replace N in M Files applies it. Open files are changed in memory (⌘ Z undoes); other files are rewritten on disk with their line endings and encoding kept. A checkpoint is saved first, so Undo All in Activity puts everything back. - Quick Open (⌘ P) opens a file by name, and understands VS Code’s prefixes:
#for a symbol anywhere in the project,@for a symbol in this file,:for a line number. - Go to Symbol in Workspace (⌘ T) finds a function, class or type anywhere in the project with no language server: TypeScript, JavaScript, Python, Java, Kotlin, Swift, Go, Rust, C, C#, PHP, Dart, Ruby and shell files are read by the shape of their lines. Go to Symbol in File is ⇧ ⌘ O.
- The Command Palette (⇧ ⌘ P) runs any command by name, including every setting switch and theme. The Help menu’s search field finds commands too.
5 · Source Control
Init, commit, publish, sync, pull, resolve
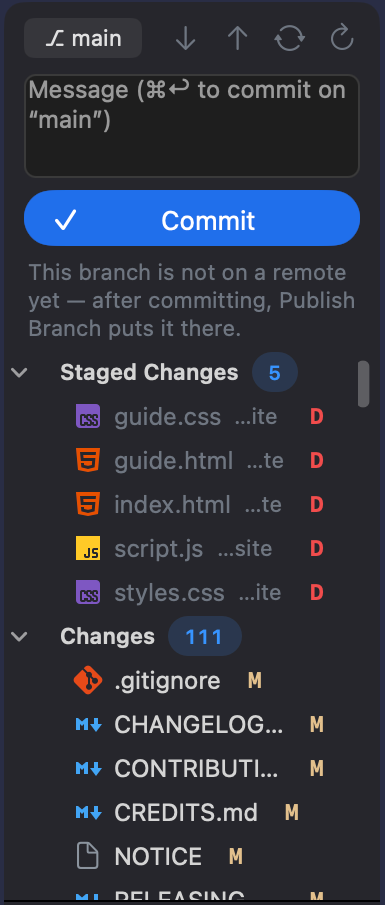
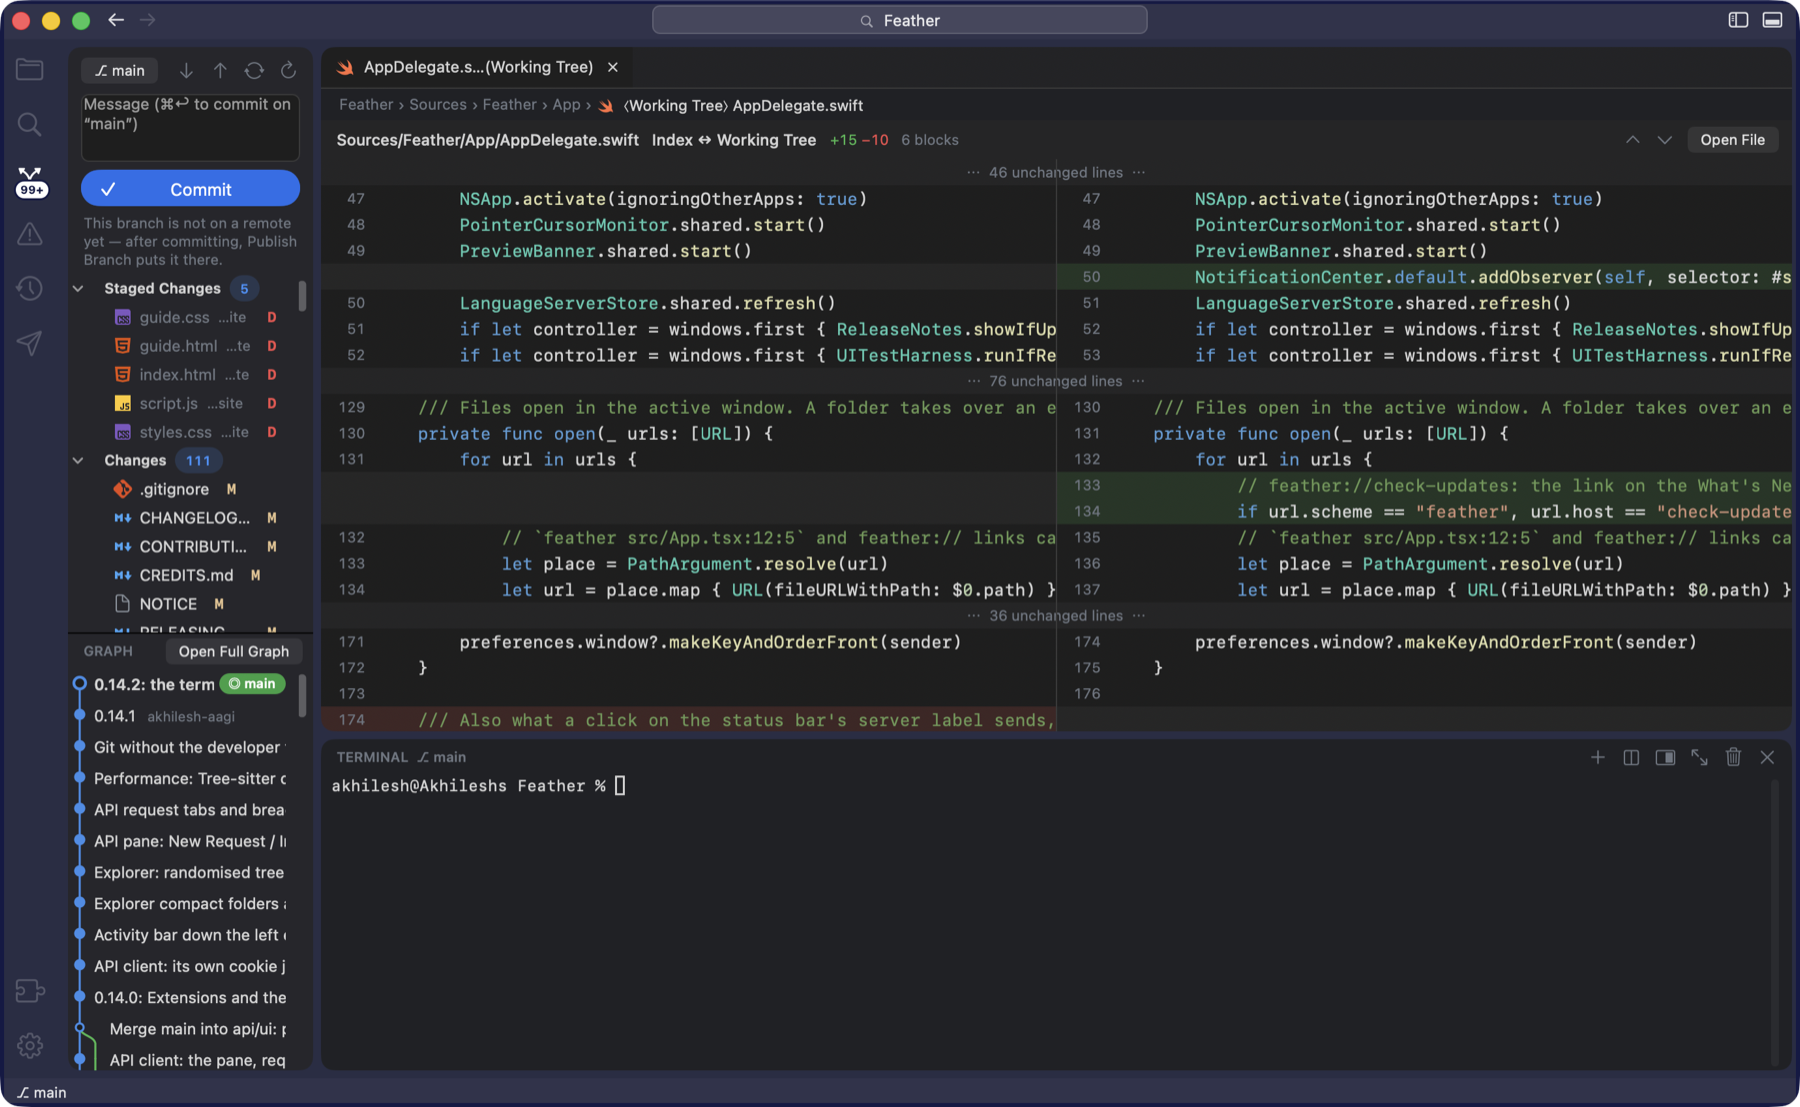
The Source Control pane (⌃ ⇧ G) is laid out like VS Code’s: the branch at the top with pull, push, sync and refresh buttons, a message box, one big button, the list of changes, and the graph underneath.
- A folder without a repository shows Initialize Repository, which starts one. On a Mac without git it shows Install Command Line Tools… instead.
- Changes and Staged Changes carry their count on a pill. Each file shows its icon, its name, its folder dimmed after it and its status letter in colour. Hover a row for stage (+), unstage (−) and discard; click it to open the diff.
- Commit. Type the message (the hint names the branch) and press ⌘ ↩ or the button. With nothing staged the button reads Commit All.
- The one button changes with the state. While there is something to commit it is Commit. Otherwise it is Publish Branch for a branch that is not on a remote, or Sync Changes ↑2 ↓1 when commits wait on either side. Publish pushes with tracking to
origin. With no remote at all it offers to create the repository on GitHub through theghcommand-line tool, private or public, or to connect a remote address, then pushes. - Pull, Push, Fetch and Sync Changes (⌃ ⇧ S: pull, then push) are also in the Git menu. A pull refused for a missing upstream or for uncommitted changes in the way says so in plain words, with what to do.
- The diff view. Click a changed file to see old and new side by side with the changed words marked; stage, unstage or revert a single block from there. ⌃ ⇧ D opens the current file’s changes.
- Blame for the current line sits in the status bar (click it for the commit); Git ▸ Toggle Blame in the Status Bar hides it. Stash, pop, apply and drop are in the branch menu and the Git menu. Open on GitHub (also GitLab and Bitbucket) opens the file and line, the repository, or its pull requests; Copy GitHub Link copies the address.
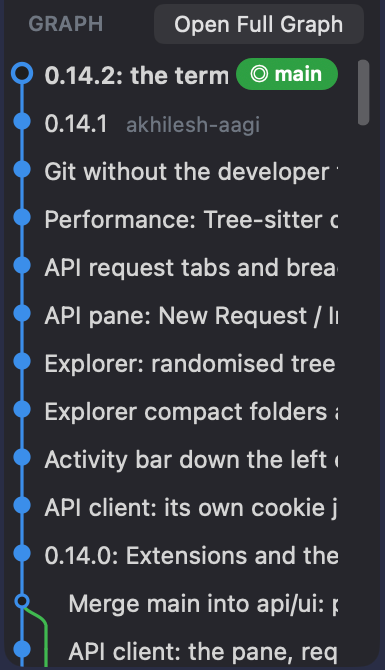
- The graph under the list shows recent commits with their lanes and branch labels; Open Full Graph (⌃ ⇧ H) opens the whole history in a tab.
- Git keeps up with the terminal. A commit, checkout, push or pull made in a terminal shows up by itself a moment later in the status bar, the pane and the explorer’s marks. Every git call has a time limit (two minutes; ten for fetch, pull and push), so a stuck git cannot hold a pane.
Merge conflicts
- A file with
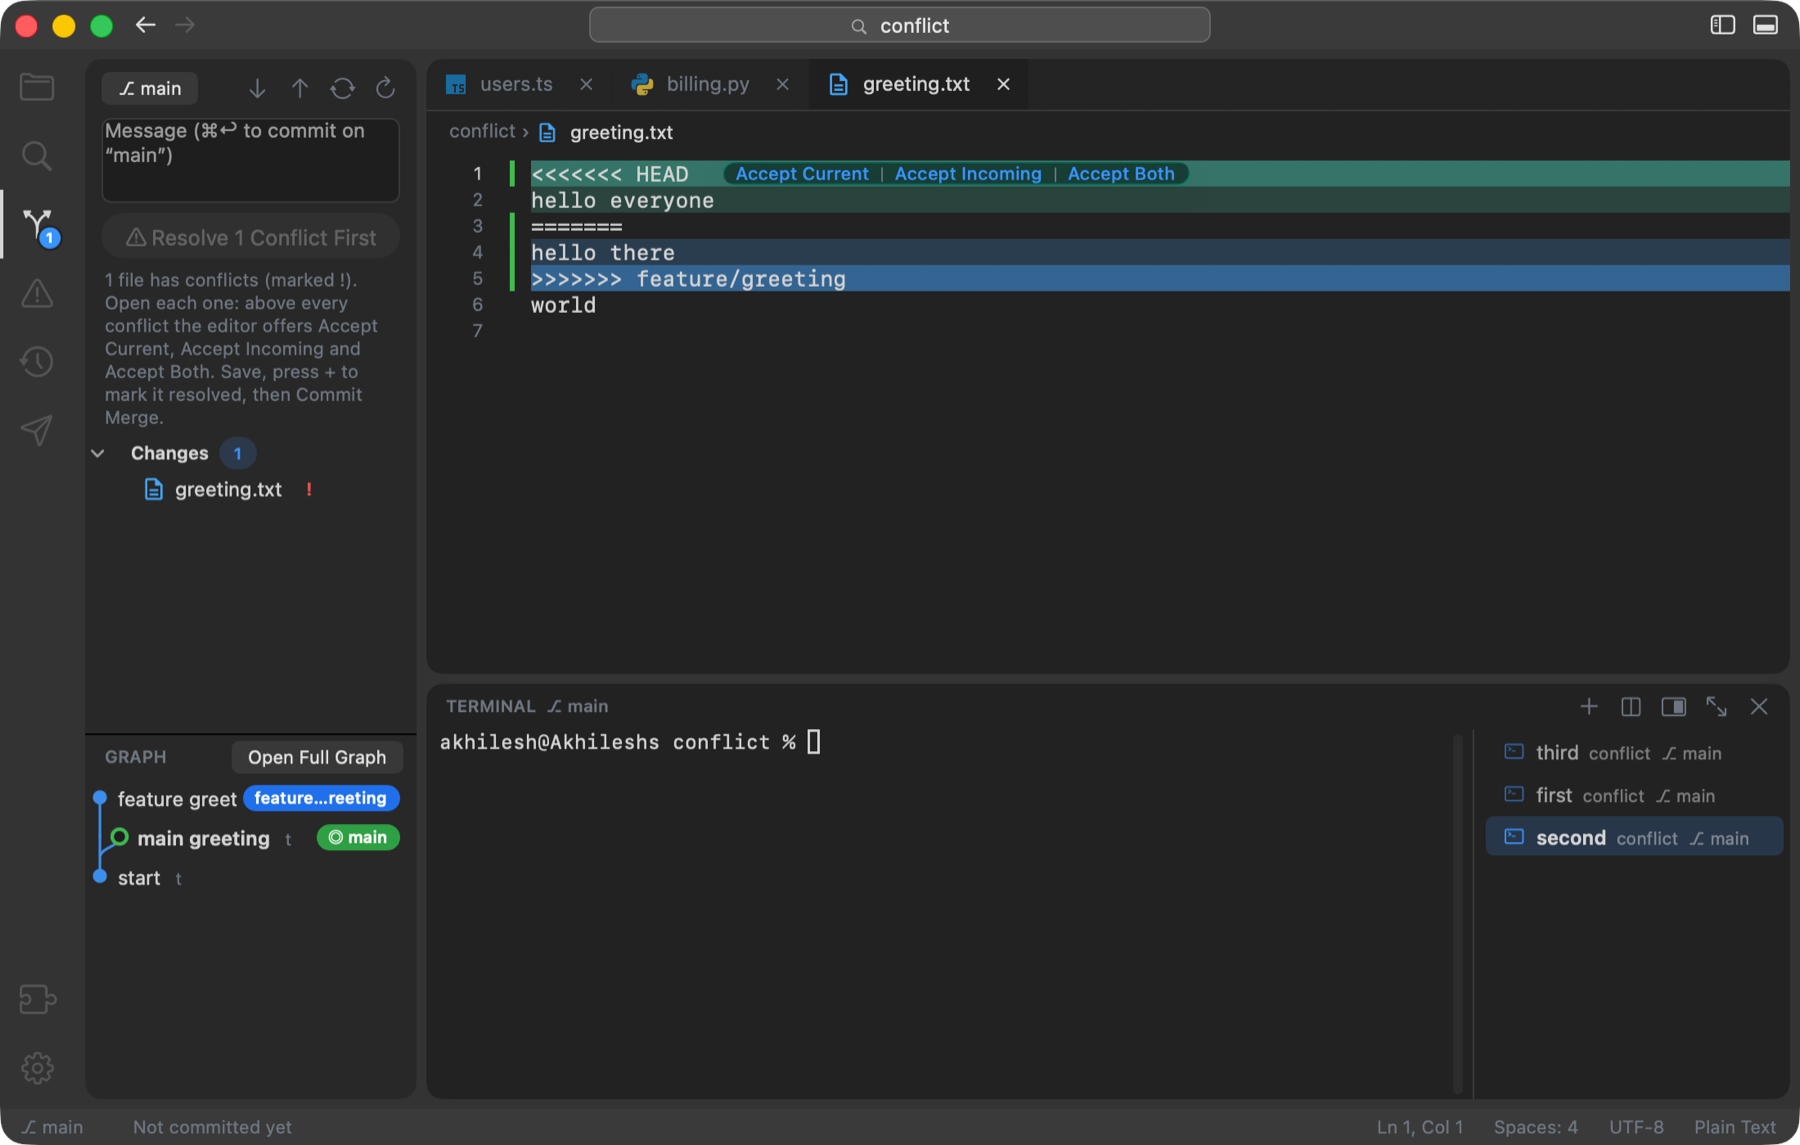
<<<<<<<blocks shows each block tinted, the current side green and the incoming side blue, with Accept Current, Accept Incoming and Accept Both above every block. Each is one undoable edit. diff3 blocks with a base section work too. - A pull or sync that ends in conflicts is a merge to finish, not an error: the button reads Resolve N Conflicts First until each file is saved and marked resolved with +, then Commit Merge. A pull with
pull.rebasepauses the same way and offers Continue Rebase and Abort Rebase.
6 · Editor
Tabs, breadcrumbs, folding, cursors, previews
- Tabs. A dot marks unsaved edits. A tab’s menu has Close Others and Close to the Right; ⇧ ⌘ T reopens a closed tab, ⇧ ⌘ ] and [ (or ⌃ ⇥) move between them. Files you have open update by themselves when something else changes them, and unsaved edits are never overwritten without asking.
- The breadcrumb above the text shows the file’s path in the project. A request tab shows its HTTP method in colour instead of a file icon.
- Syntax colouring for TypeScript, TSX, JavaScript, JSX, Python, Java, Dart, Kotlin, Swift, JSON, CSS, HTML, YAML, shell, Go and Rust comes from a syntax tree (Tree-sitter), updated as you type and re-read off the main thread; embedded code (
<script>and<style>in HTML,css`…`andhtml`…`templates) is coloured as its own language. Other languages, and files over 1 MB, use pattern colouring. - Brackets and quotes close themselves and the matching bracket is highlighted; ⇧ ⌘ \ jumps to it. ⌘ / comments a line. Move a line with ⌥ ↑ / ↓, copy it with ⇧ ⌥ ↑ / ↓, delete it with ⇧ ⌘ K, indent with ⌘ ] / [.
- Suggestions come from the words already in the file, and from the language server when one is running; ⌃ Space asks for them. The scan of a big file runs off the main thread, so the first keystroke does not stutter.
Multiple cursors
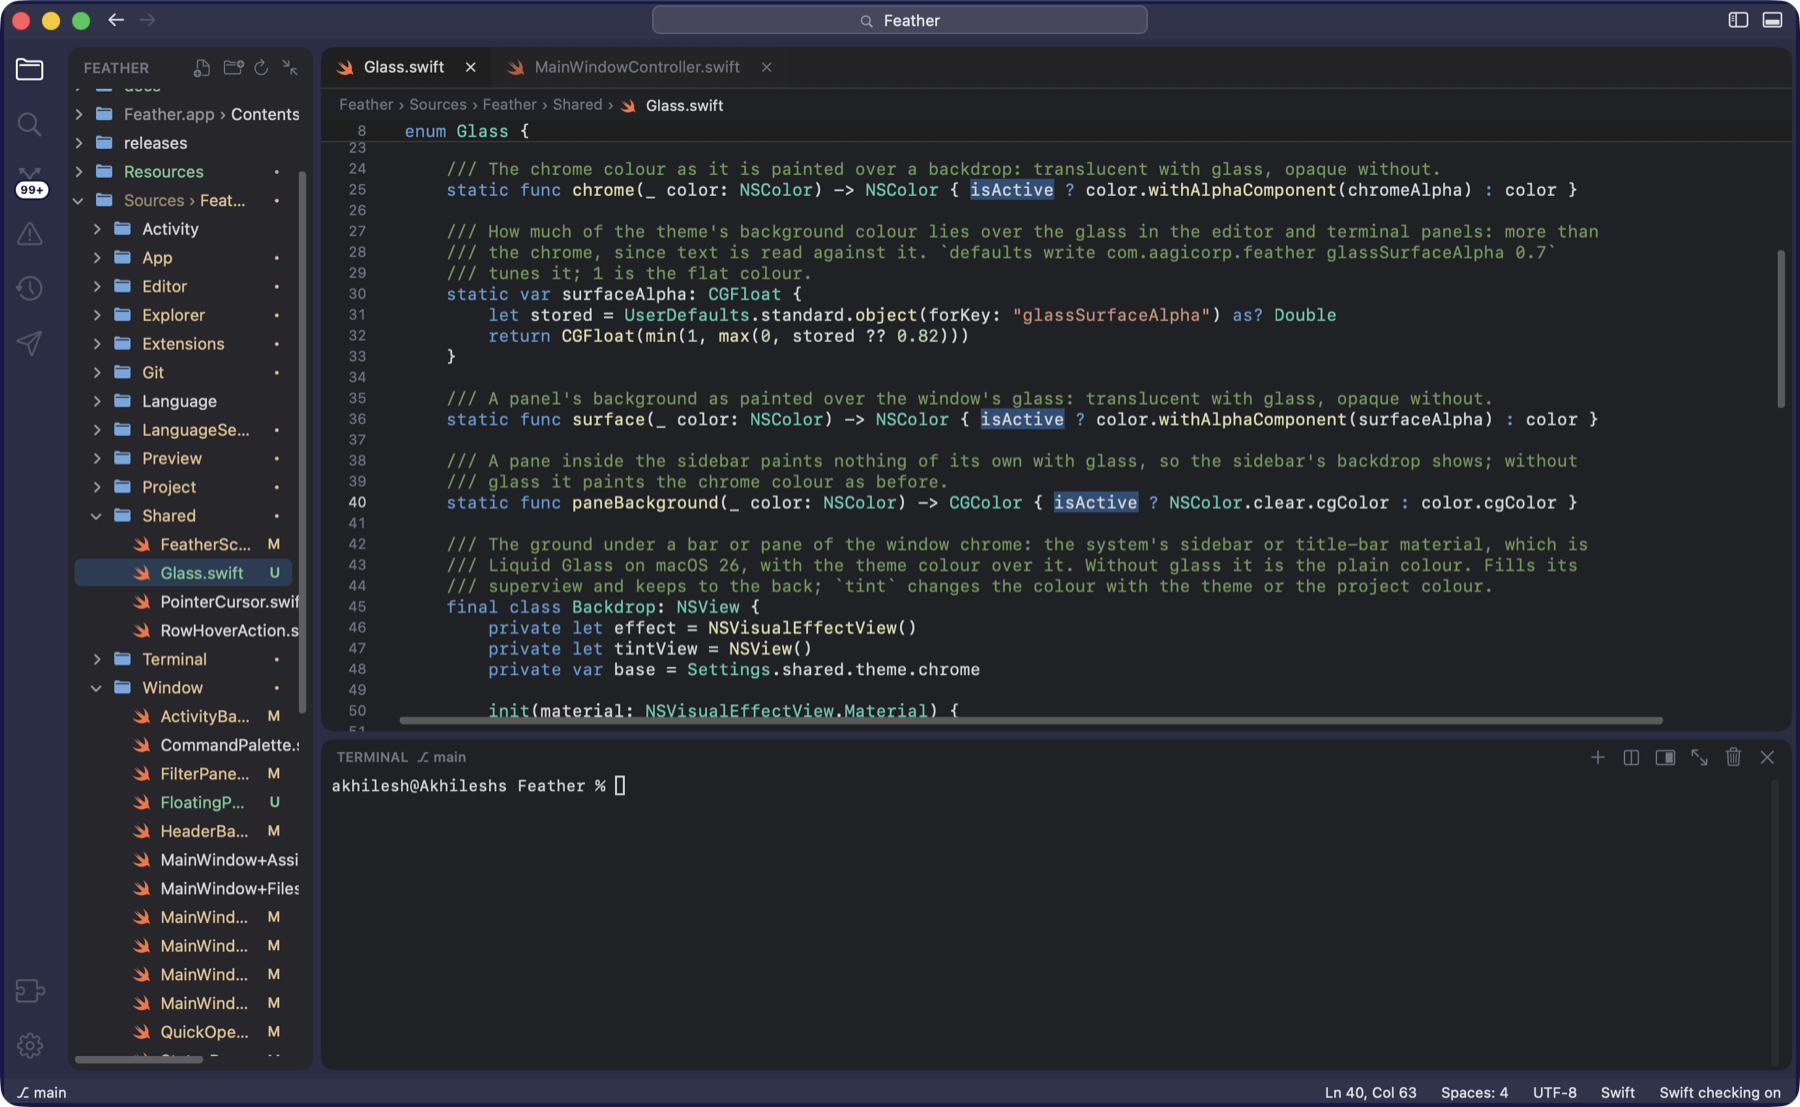
isActive after ⌘ D three times; typing now changes all four.⌘ D selects the word and then each next occurrence, ⇧ ⌘ L selects them all, ⌥ ⌘ ↑ / ↓ add a cursor above or below, ⌥-click adds one anywhere, Esc goes back to one. Typing, deleting, pasting and the arrow keys act at every cursor.
Folding and sticky scroll
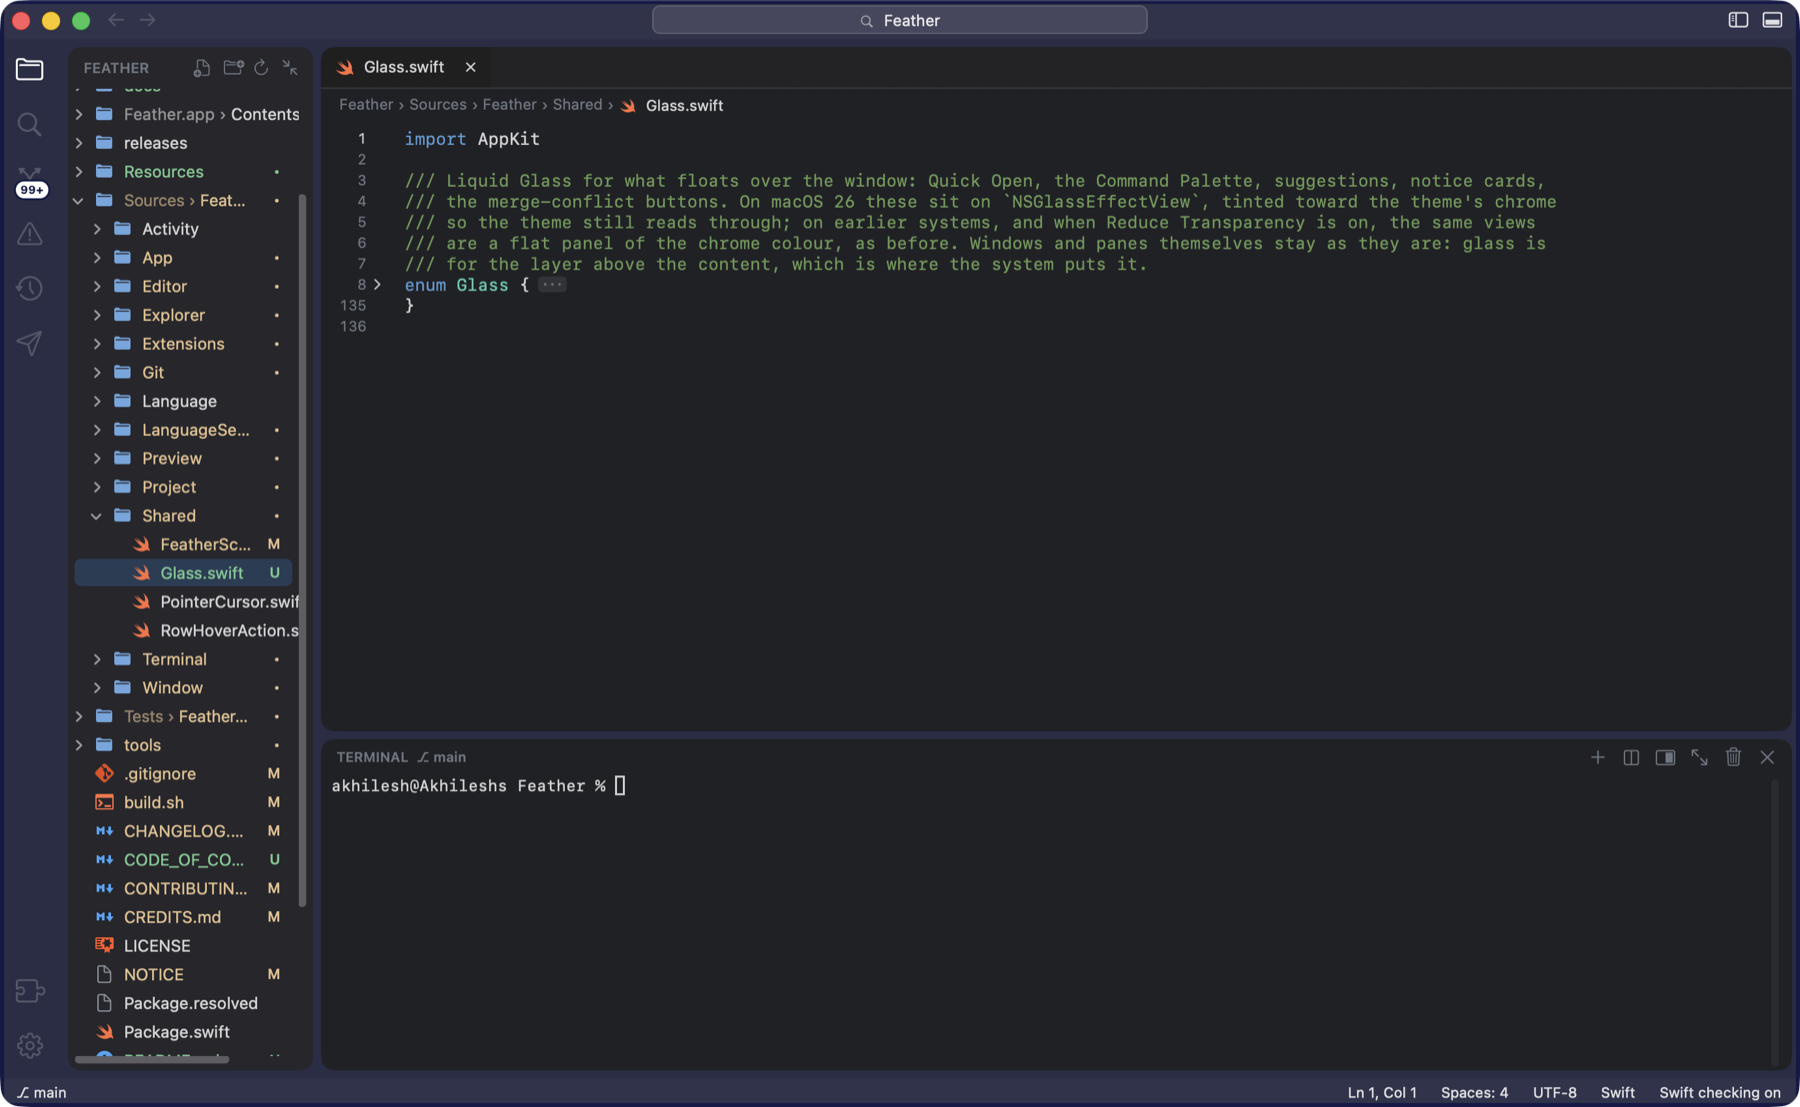
enum Glass folded away: lines 8 to 135 are one row with an ellipsis badge.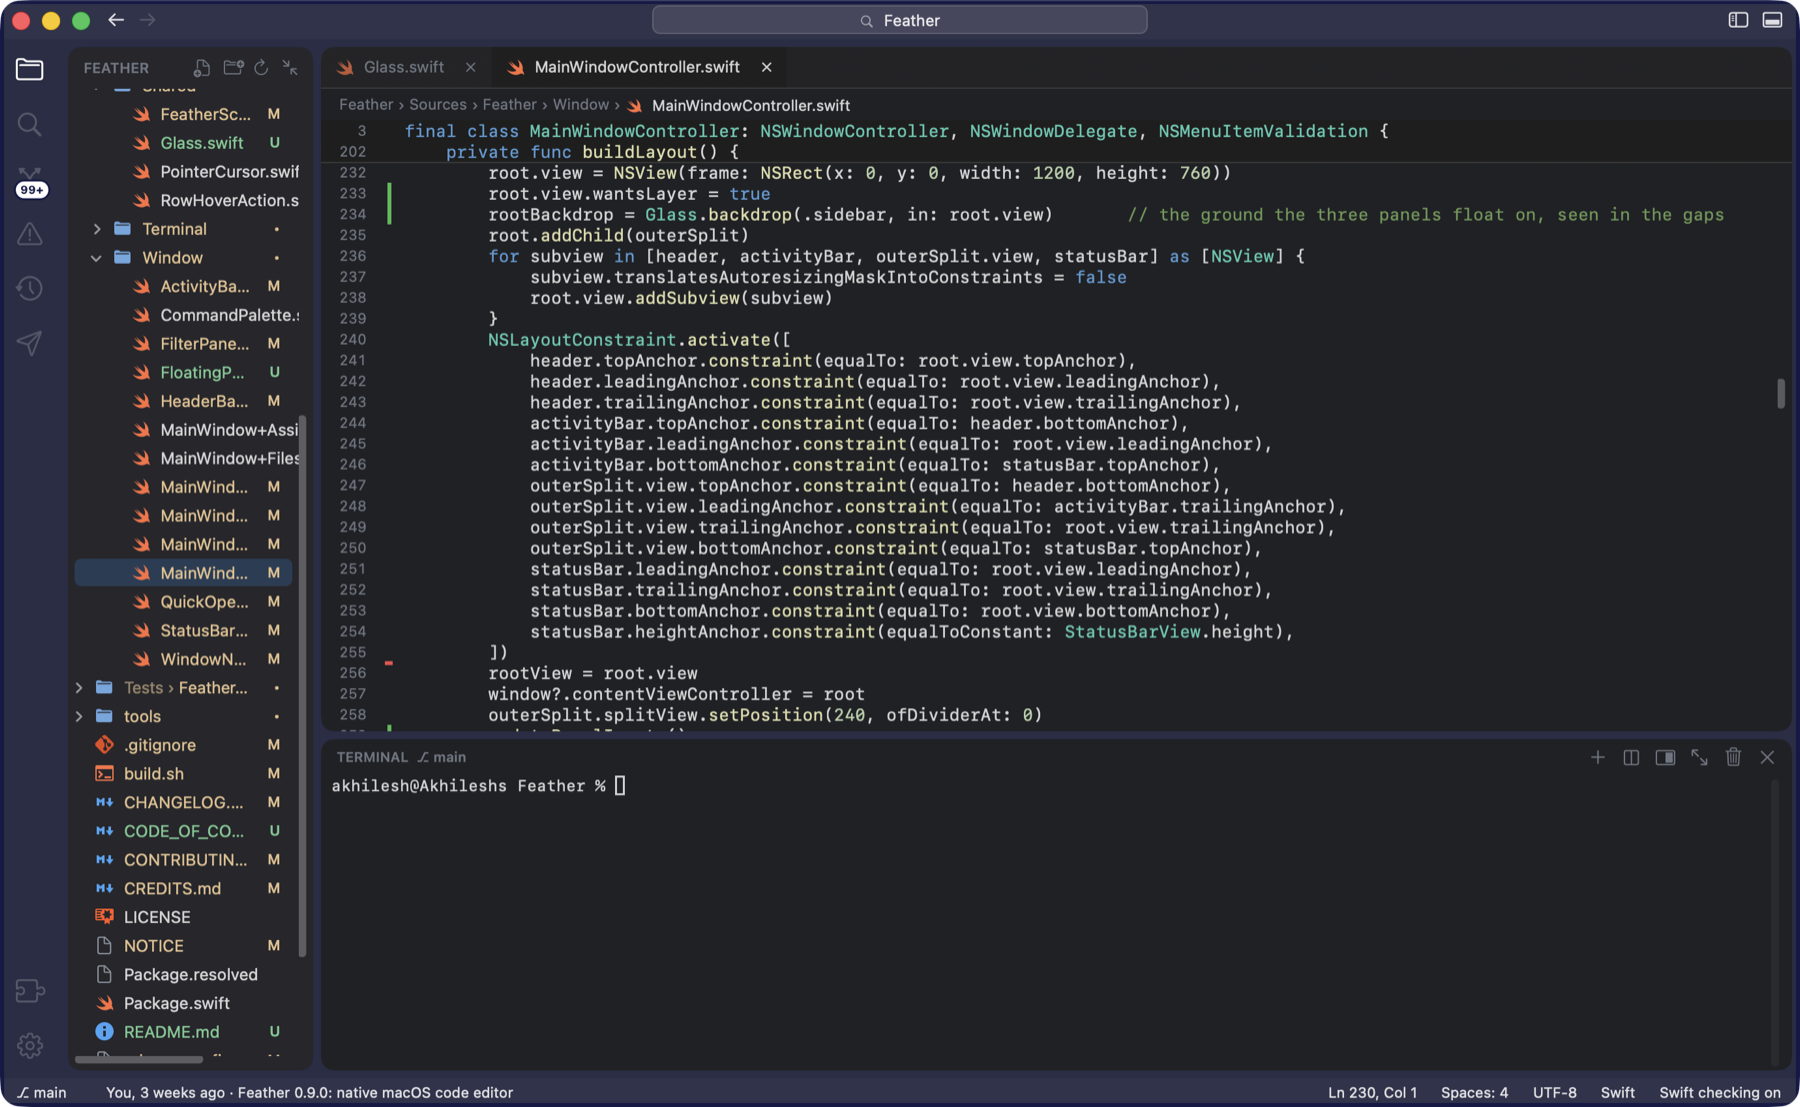
A chevron in the gutter folds a block; ⌃ ⌘ [ / ] fold and unfold, ⌃ ⇧ ⌘ [ / ] do all of them. For parsed languages a block folds exactly where it ends; elsewhere indentation decides. Searching or jumping into a folded block opens it. With sticky scroll on, the class and function you are inside stay pinned at the top while you scroll.
Code intelligence
With a language server running (see Languages): ⌘-click a name or press F12 to go to its definition, ⇧ F12 for its references, F2 to rename it everywhere, ⌥ ⌘ I for quick info. ⌃ - and ⌃ ⇧ - (or the arrows in the header) go back and forward.
Formatting and saving
Format Document (⇧ ⌥ F) and Format Selection use the language server. Settings ▸ Files & Saving has Format on save, Trim trailing whitespace on save, End files with a newline on save and Auto save: off, after a delay (one second), or when focus changes (switching tab or app). A project’s .editorconfig is honoured per file: indentation, line endings, final newline, trailing spaces.
Split, wrap, zoom
⌘ \ splits the editor to the right so two files sit side by side; ⌥ ⌘ \ moves the focus between the groups. ⌥ Z toggles word wrap; ⌘ = and ⌘ - change the font size.
Markdown and media
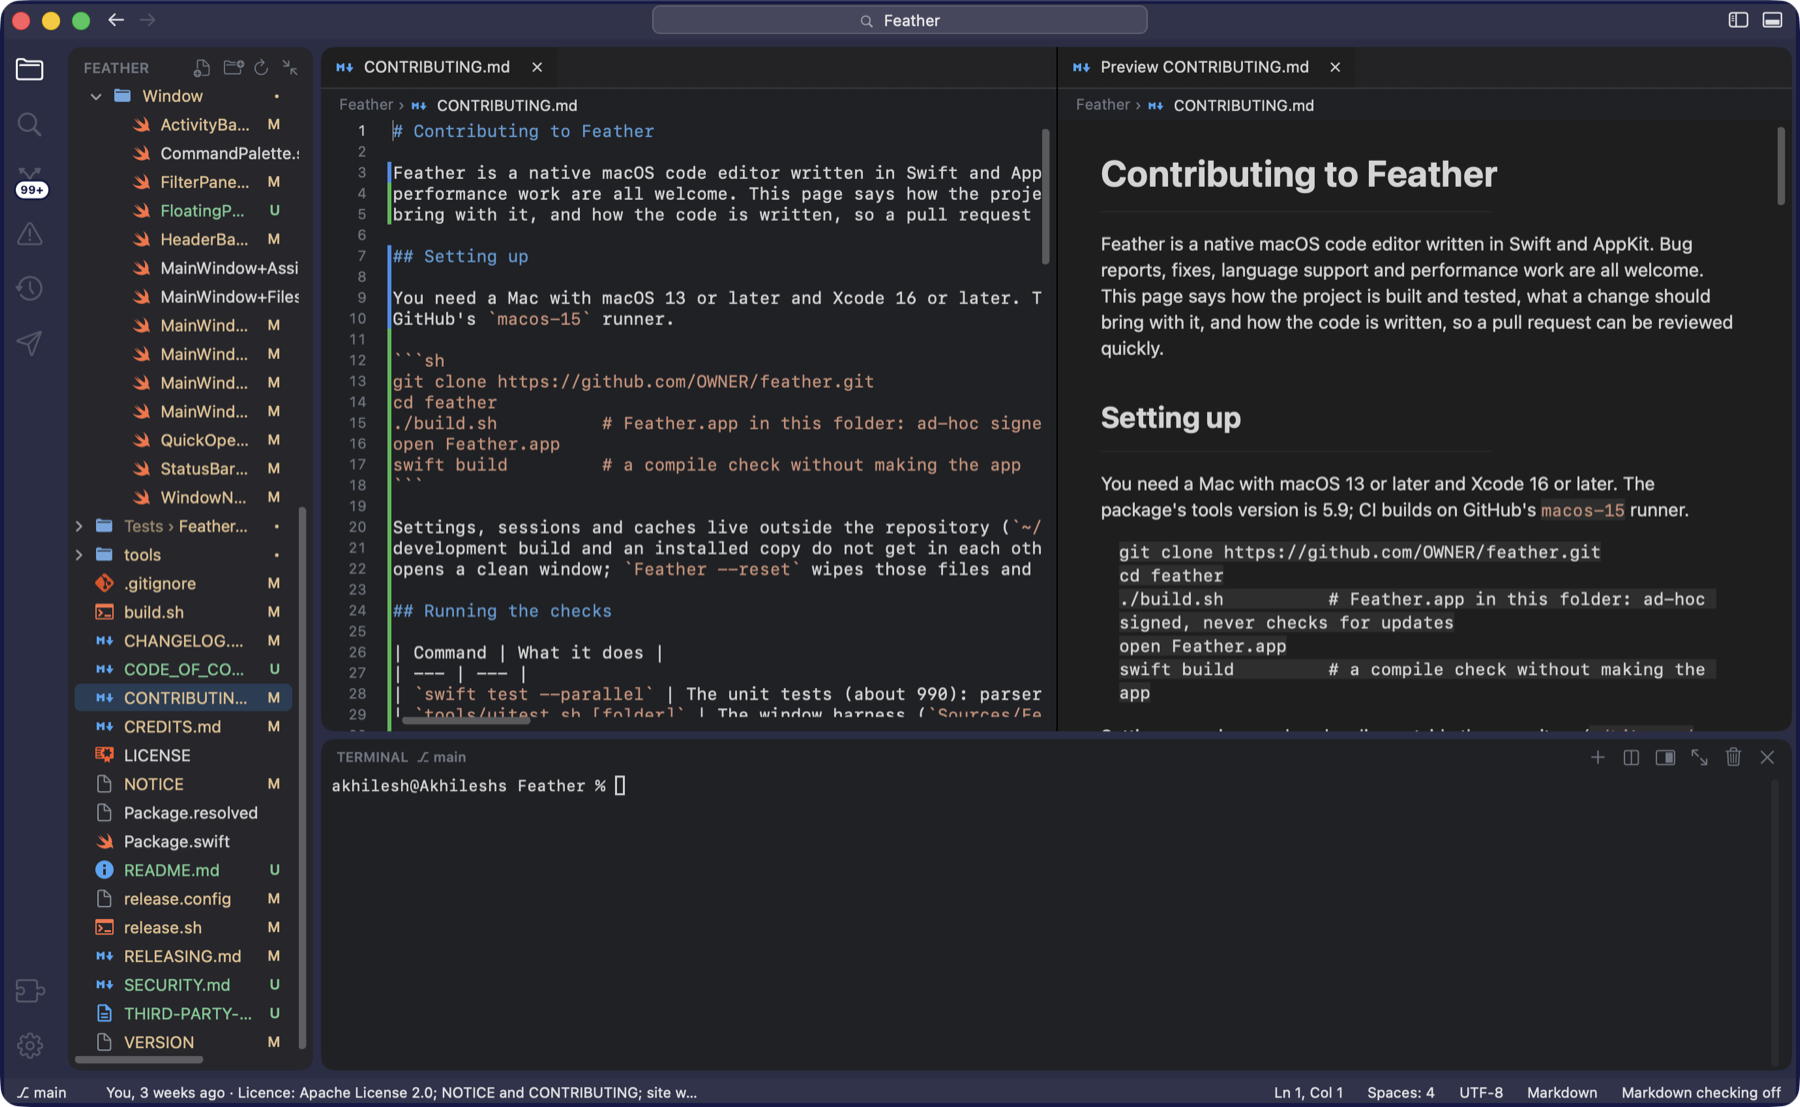
- ⇧ ⌘ V shows a Markdown file as a formatted page in place of the text; ⌥ ⌘ V opens the preview beside it.
- Images, PDFs and videos open in a tab of their own, in place.
- A
.httpor.restfile gets a strip above it with one button per request in the file; see Requests.
7 · Languages
What works out of the box, and what a language server adds
- With nothing installed: syntax colouring for every common language, folding, bracket matching, word suggestions, Go to Symbol in File and in Workspace, TODO comments, and Check Project for Errors with the project’s own compiler or linter (see Problems).
- With a language server already on your Mac: errors as you type, completions, go to definition, references, rename, quick info and formatting. Feather looks for the usual servers on your shell’s path and uses the first it finds, among them
typescript-language-server,pyright-langserverorpylsp,jdtls,kotlin-language-server,dart,sourcekit-lsp,gopls,rust-analyzer,clangd,intelephense,yaml-language-server,bash-language-server,marksman,taplo,lemminx,svelteserver,prisma-language-server,docker-langserverand thevscode-html,cssandjsonlanguage servers. - The status bar says which it is: “TypeScript checking on” when a server is running for the open file, “TypeScript checking off” when none was found, with a hint on how to get one from the terminal.
- Installing languages from inside Feather is coming to the Extensions window. The earlier Languages pane has been removed in the meantime.
8 · Problems and TODOs
Every error in one list
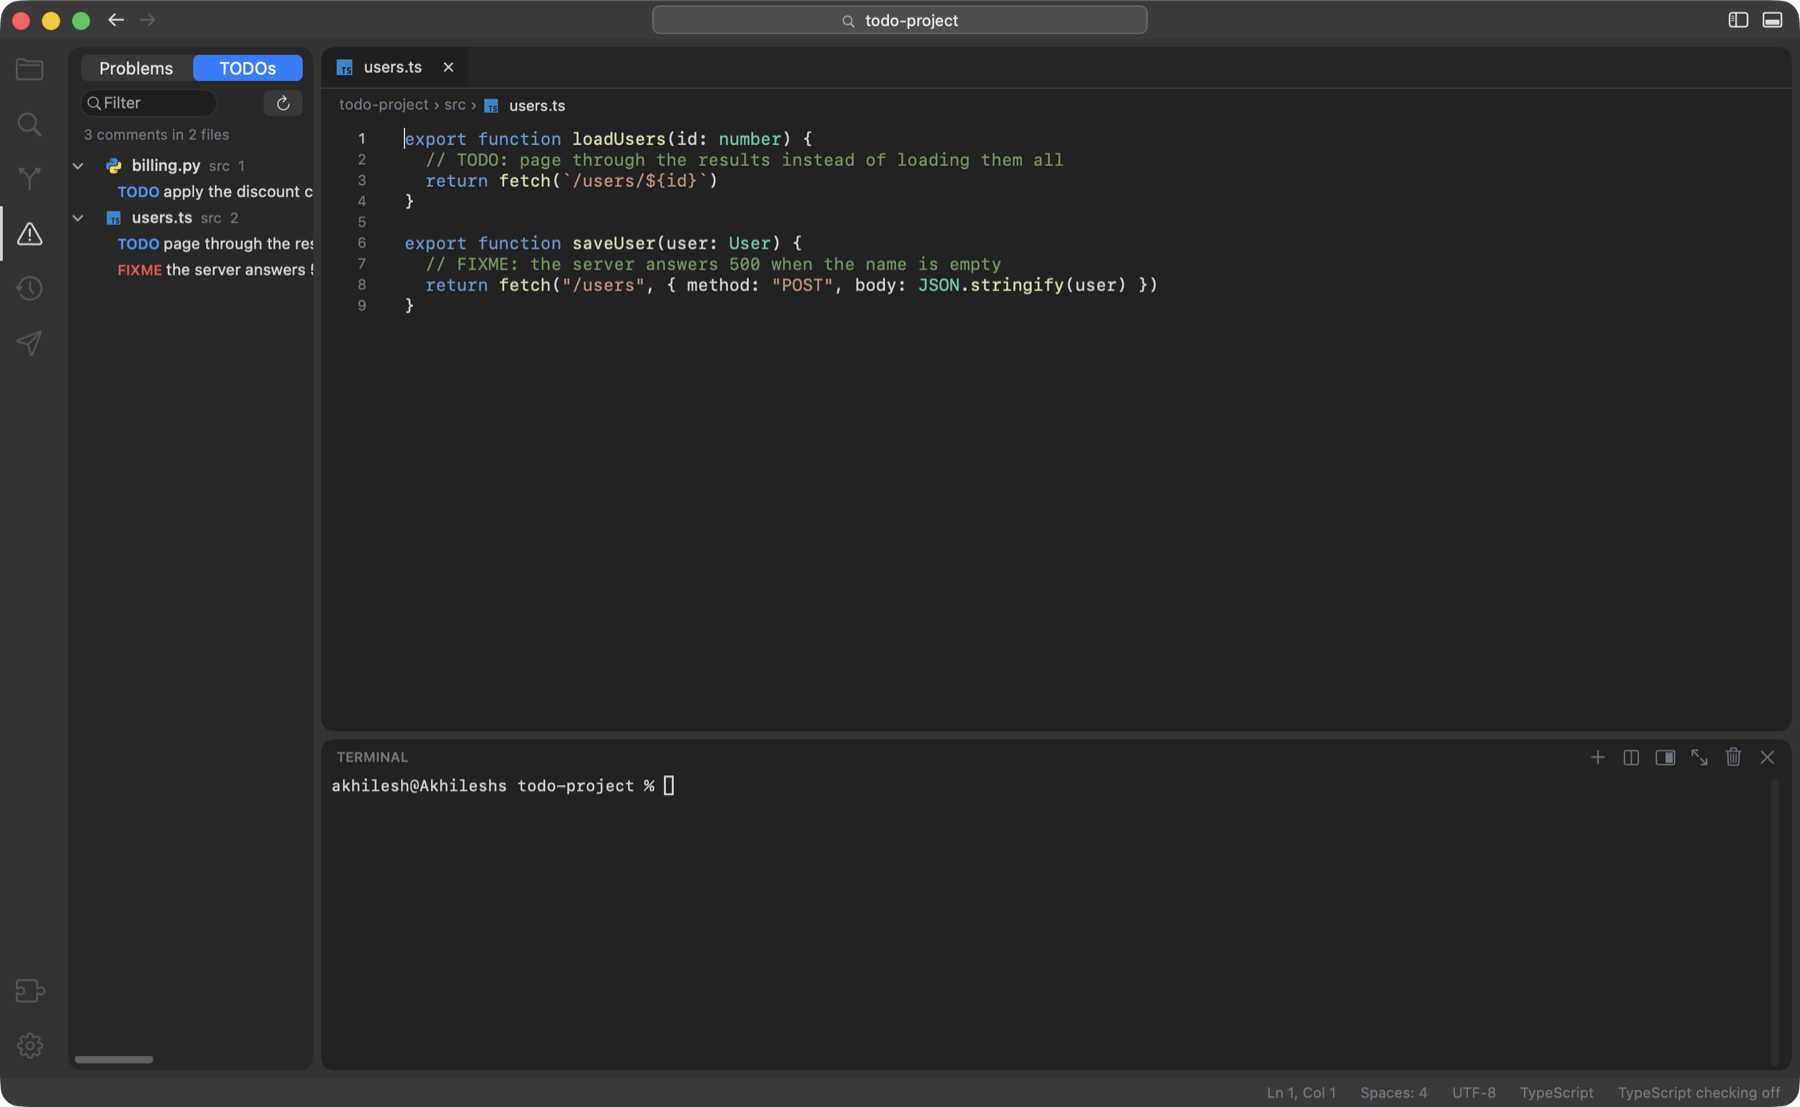
- The Problems pane (⇧ ⌘ M) lists every error and warning in the project; click one to jump to the line. The same problems show as squiggles in the editor and as counts in the status bar.
- Check Project for Errors (⇧ ⌘ B, or the play button in the pane) runs the project’s own tools and needs no language server:
tscfor atsconfig.json,pyright,pyflakesorpy_compilefor Python, Maven or Gradle,dart analyze, andswift build. It also runs a moment after you save a file of that kind (Check the Project for Errors After Saving). The pane says “Checked with tsc · just now”. A language server’s report for a file takes over from the checker’s, so nothing is listed twice. Nothing runs in Restricted Mode. - Fix This, on any problem, types a sentence with the error and its exact place into your assistant’s terminal, for you to add to and send with Return.
- TODOs, the tab beside Problems, lists TODO, FIXME, HACK and NOTE comments across the project.
- Paths in the terminal (
src/App.tsx:42:7, a Java stack frame, a Python traceback line) open at that line with a ⌘-click.
9 · Activity
What changed since the checkpoint
A checkpoint is a snapshot of the project you can return to. Feather saves one when a folder is opened (Settings ▸ General) and whenever you press + Checkpoint; it keeps the last 30. Checkpoints work in any folder, need git installed but never touch the project’s own git history, and leave out files git ignores and files over 5 MB.
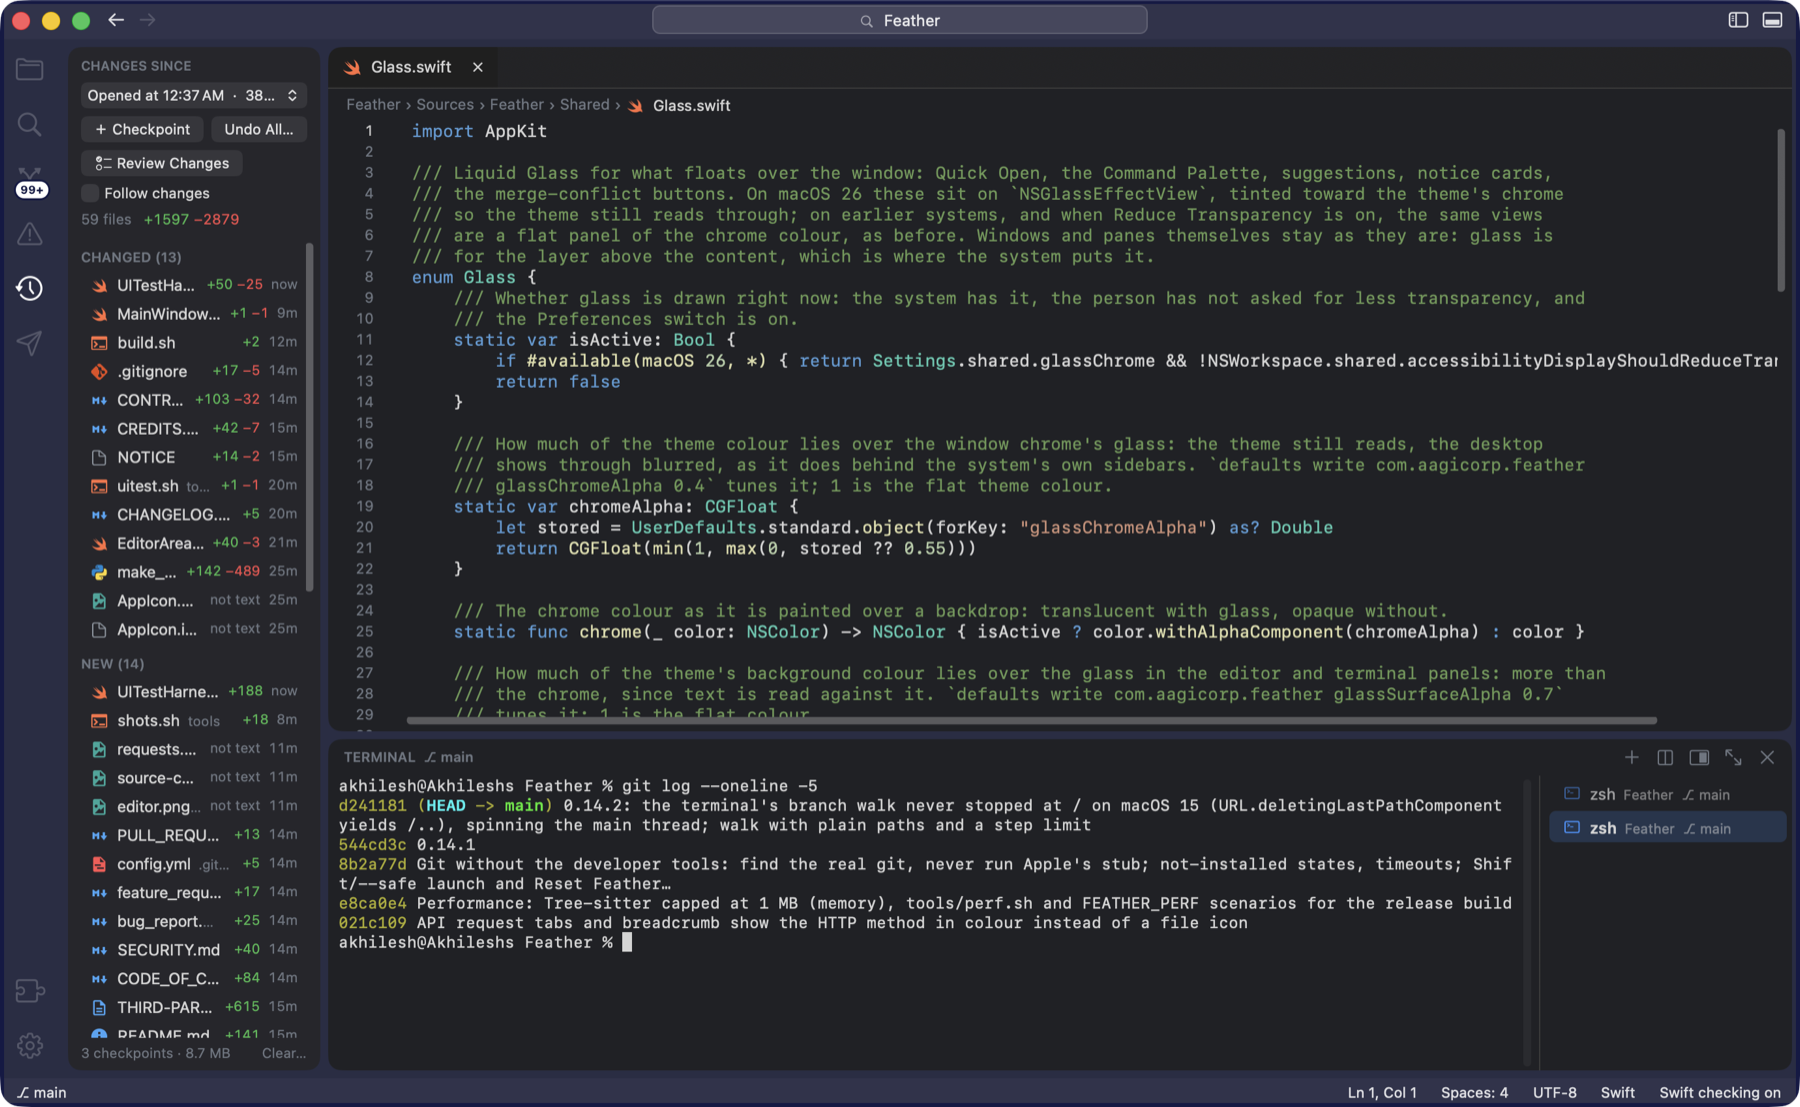
- The Activity pane (⌃ ⇧ A) lists every file changed since the checkpoint, newest first, with lines added and removed; a green dot marks files changed in the last few seconds. Click a file for old and new side by side.
- Undo All… puts every file back; new files go to the Trash and Put the Changes Back reverses it. Restore This File… does it for one. The picker at the top compares against an older checkpoint.
- Follow changes opens each file as it is changed and flashes the changed lines, without taking the keyboard from the terminal. When an assistant stops after changing files, a card says so (“Claude Code changed 4 files”) with Review in Activity.
- Review Changes (⌃ ⇧ R, or the button at the top of the pane) walks through every changed file in one tab, like reviewing a pull request: Keep or Undo on each block of changed lines, Keep or Move to Trash for new files, Keep Deleted or Restore for deleted ones, Keep All and Undo All… in the header. Keys: j / k move between blocks, K keeps, U undoes, ⌘ ] / [ move between files.
Clicking a file opens the same side-by-side view as Source Control’s (old on the left, new on the right); hover a block for Undo This Change.
10 · Terminal
Terminals, splits, tasks and your AI assistant
- The panel shows or hides with ⌃ ` or ⌘ J; ⌃ ⇧ ` opens a new terminal in the project folder. Its header shows the branch and what the terminal in front is doing: “▶ npm run build · 12 s”, then “✓ finished in 14 s” or “✕ exit 1”. New zsh and bash shells carry a small hook that marks the start and end of every command, so this is exact; your own shell files are read as before and nothing in your home folder is changed (Terminal ▸ Open Shell Integration Files shows the hook).
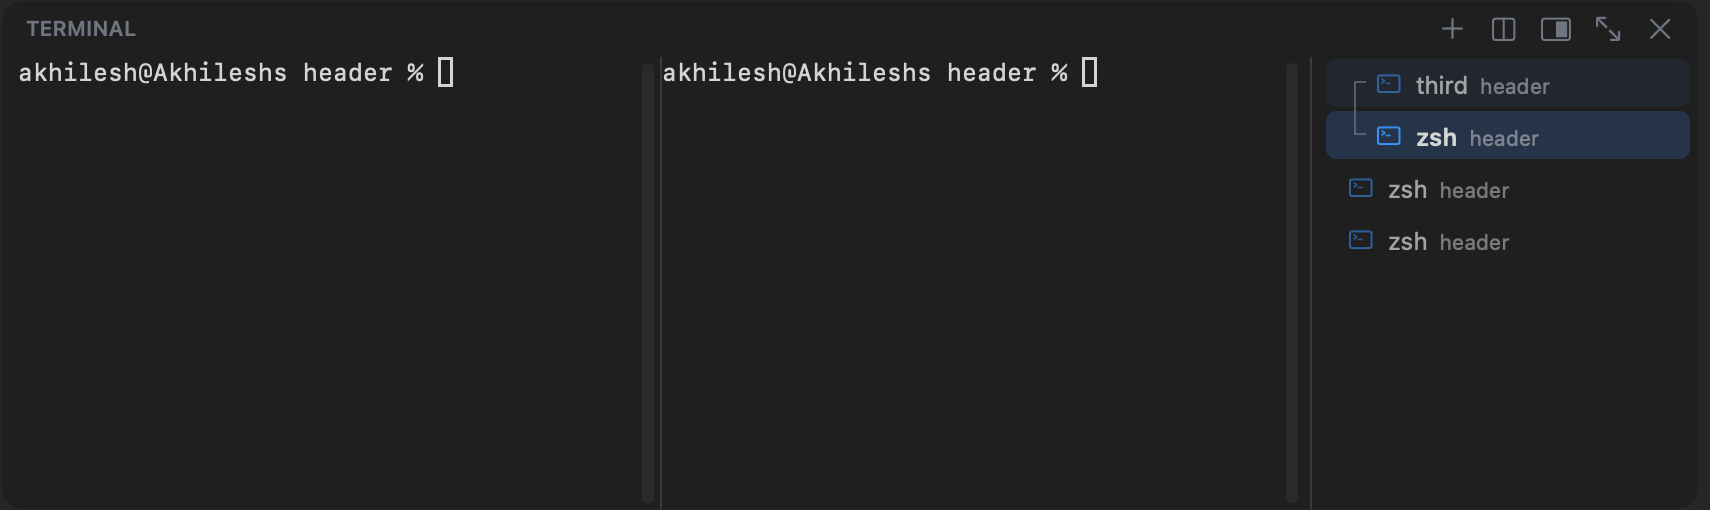
- The list on the right names each terminal with its folder and branch. Double-click a name to rename it; Change Color and Change Icon are in its menu; the trash icon appears on hover. Drag a row up or down to reorder; a row dropped just above the list lands at the top, just below it at the end. Names, colours, icons and the order come back at the next launch.
- Splits (⌃ ⇧ 5, or the split button) put a second shell beside the one in front, up to four columns; drag the divider to size them. The list joins the members with a bracket; click any member to show the group with that one in front. Killing a member closes just that column.
- Maximize (⌃ ⇧ M, the ⤢ button, or a double-click on the header) gives the terminal the editors’ room; the same again brings them back. Terminal on the Right (View menu, or the button in the header) moves the panel to a tall column beside the editor.
- Links. ⌘-click a path to open it at that line, or a
curl …line to turn it into a request in the API client. Copy on Select is in the Terminal menu.lsoutput is coloured. ⌥ ⌘ ] / [ move between terminals.
AI assistant tools
- Start AI Assistant (⌃ ⌥ A) opens a terminal in the project and starts the tool you chose. Terminal ▸ Choose AI Assistant (or Settings ▸ AI Assistant) picks Claude Code, Codex, Gemini CLI, aider, Cursor Agent or opencode, or Use Another Command… for anything that runs in a terminal. Tools that are not installed are greyed out, with the official install command and a Copy button; Feather installs nothing itself.
- The header reads “Claude Code · working 2 m”, “waiting for you” when it asks something, and “stopped after 2 m” when it goes quiet.
- Send Selection to Terminal (⌃ ⌥ S) and Send File Reference to Terminal (⌃ ⌥ L) type into the assistant’s prompt; ⌃ ⌥ K asks about the selected code; Fix This in Problems hands it an error. Nothing is sent until you press Return.
Notifications
Feather can tell you when a terminal finishes or asks something: a small card in the corner of the window (and a sound), or, when the window is out of view, a macOS notification and a Dock badge. Both are off by default: switch them on with Settings ▸ Terminal ▸ Tell me when a terminal is waiting and Play a sound…, or the same two switches in the Command Palette. Clicking the notification brings you back to that terminal.
Tasks and running
- Run Task… (⌥ ⌘ R) lists what the project can run:
package.jsonscripts, Maven and Gradle goals, Flutter commands, pytest, Django, FastAPI,Makefiletargets, and your own tasks in.feather/settings.json. Type to narrow, Return to run it in a terminal. ⌥ ⇧ ⌘ R reruns the last one. Tasks report whether they finished or failed, with the exit code. - Run Project (⌘ R) runs the project the usual way for its type; Edit Run Command… changes it. Run Current File is ⇧ ⌘ R, Stop is ⌘ ..
11 · Preview
Your running app beside the code
- When a terminal prints an address such as
localhost:3000, Feather offers Open Preview: the app in a tab, reloading when files change (Settings ▸ Preview). The toolbar has back, forward, reload, the address and phone, tablet and full widths. - ⌃ ⌥ P shows the preview, ⌃ ⌥ ⇧ P shows it beside the code, ⌃ ⌥ N opens another preview tab, ⌃ ⌥ B opens the app in your browser. View ▸ Preview This Page previews a plain HTML file with no server.
- Sign-in cookies marked “Secure” are kept for apps on
http://localhost(macOS 14 or later), so signing in works in the preview. The preview exists only while its tab is open and adds nothing to the download.
12 · Requests
The API client
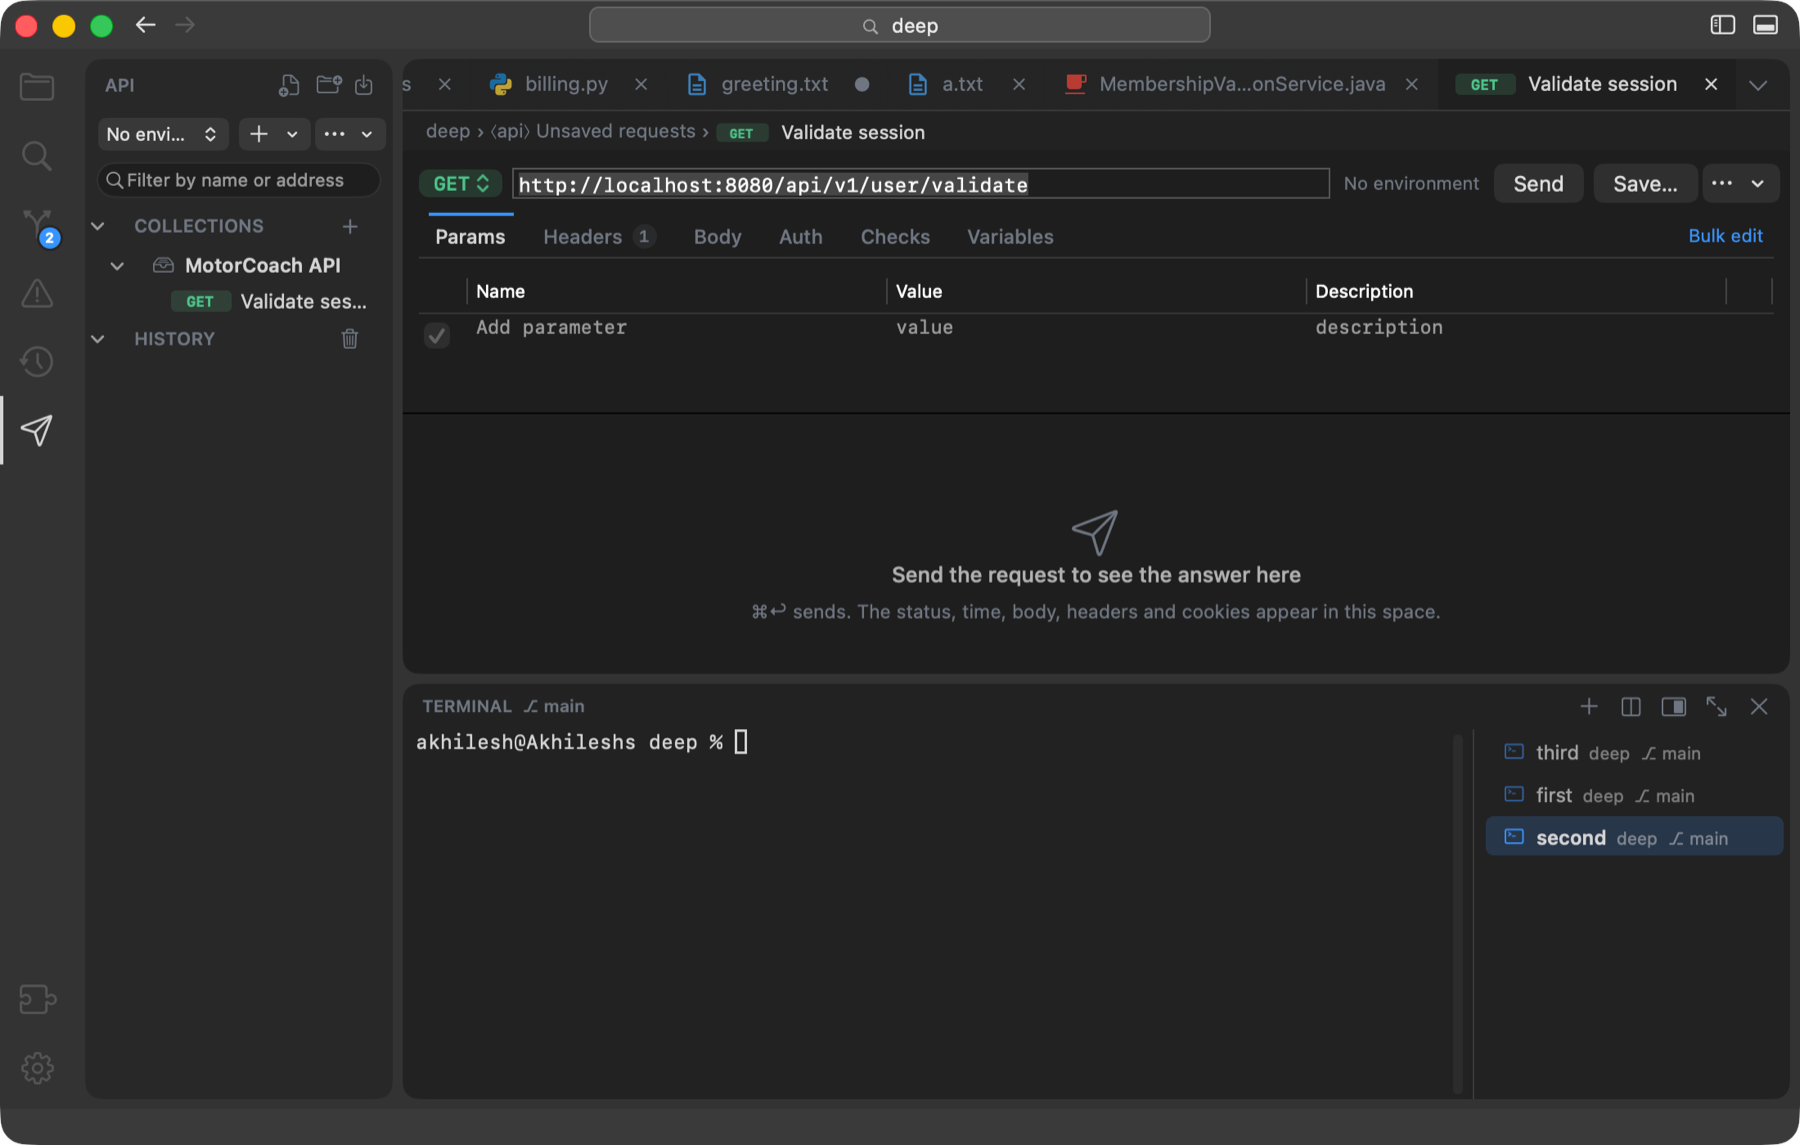
The Requests pane (the paper-plane icon, ⌃ ⇧ I) is an API client in the style of Postman, built in and on from the first launch; Feather ▸ Extensions… switches it off. Collections, folders and requests are plain JSON in the project’s .feather/api folder, so the team shares them through git; collections that are just for you live in your own folder, and the last 500 requests are kept as history outside the repository. A variable marked secret is stored in your Keychain and never reaches a file.
The pane
- One row of controls: the environment picker, New ▾ (request, collection, folder, environment, import, paste cURL) and ⋯ (export, cookies, generate from OpenAPI). A filter field narrows by name or address.
- Collections hold folders and requests, each method on a pill of one width (GET green, POST amber, PUT blue, DELETE red). +, duplicate and delete appear on the row under the pointer. Drag to reorder or to move between folders and collections; right-click for Rename, Copy as cURL, Variables…, Run, Export… and Delete.
- The history underneath is grouped by Today, Yesterday and date; click an entry to open that request as it was sent.
A request
- The request bar: the method on a pill of its colour, the address (
{{variables}}in blue), the active environment as a chip, the blue Send button (⌘ ↩), Save (⌘ S, into the collection; a scratch request asks which) and a ⋯ menu with Cookies, Copy as cURL and where the answer goes (below or beside). - Tabs with counts: Params (kept in step with the address), Headers, Body (JSON or text in a real editor, a form, or multipart with files), Auth (inherit, none, bearer, basic, API key), Checks and Variables.
- Tables end in a row that says “Add parameter” (or header, or field) and becomes real as you type. ✕ appears at the end of a row under the pointer, ⌫ removes the selected row, and there is a Description column. Bulk edit turns Params, Headers or a form body into text, one
name: valuea line, with//in front to switch a row off. - Checks are forms, not scripts: the status is 200, a JSON path equals a value, a header contains text, the time is under a limit. Variables take a value from the answer into a variable (
$.token→token) for the requests after it, so a sign-in followed by authenticated requests works without code. - The answer: the status on a pill in its colour (green 2xx, amber 3xx and 4xx, red 5xx and failures) with the time and size; Body with a Pretty / Raw toggle, pretty-printed and coloured, with ⌘ F, Copy, Copy path (the JSON path under the caret, for a check or a variable) and Save; Headers and Cookies with their counts; Checks with ✓ or ✕ and a plain sentence each. A spinner and Cancel (Esc) while sending; answers over 50 MB offer Save to File.
- Cookies (in the ⋯ menu, or Requests ▸ Cookies…) lists what servers set, where each applies and when it ends, with Delete and Clear All. A sign-in cookie set over
http://localhostis kept and sent back, as browsers do.
Environments and variables
Environments (Local, Staging…) hold {{variables}}; pick one at the top of the pane. Manage environments… opens a sheet with the variables (tick Secret to keep a value in the Keychain), the timeout, follow redirects and certificate checking. A collection’s Variables… opens the same sheet for its own variables.
Run a collection
Run Collection or Folder… (⌥ ⇧ ⌘ R, or the right-click menu) sends every request in order with the chosen environment, in a results tab with the status, time and checks per request, and Stop, Run Again and Rerun Failed. Values captured from one answer flow into the next request.
Import, export, cURL, .http files
| Format | Import | Export |
|---|---|---|
Postman collection v2.1 and environment (.json) | yes (scripts are kept as text; :id becomes {{id}}) | yes |
.http / .rest files (VS Code REST Client) | yes | yes |
| cURL command | paste, or ⌘-click a line in the terminal | Copy as cURL |
OpenAPI 3 / Swagger (openapi.yaml, openapi.json, swagger.json) | yes: one request per operation, in folders by tag; each server becomes an environment | — |
- Import… takes several files or a whole folder at once; files can also be dropped on the pane. Exports never contain secret values; the export says which were left blank. Copy as cURL resolves variables and sign-in and writes uploads as
-Fparts. .httpfiles: open one and a strip above it lists its requests (###between them;@name = valuelines are file variables). The request your cursor is in is highlighted; click its button to open it in a request tab and send it.- From the terminal: ⌘-click a
curl …line printed by you, a script or the assistant, and it becomes a request in a “From terminal” collection in your personal folder. - With the assistant: Requests ▸ Ask Assistant About Last Request types a short brief at its prompt: the cURL line, the status, time and size, the first lines of the body and any failed checks. A project with an OpenAPI file at its root (or in
api/,docs/,spec/) gets an offer to Generate Requests from it.
13 · Extensions
What is built in, and what is coming
- Feather ▸ Extensions… opens the Extensions window. The catalogue of installable extensions needs a home on the web first, so for now the window shows a coming soon card and lists what is built in under it, each with a switch.
- Built in today: the API Client (the Requests pane), on by default. Switched off, a feature costs nothing: no menu, no sidebar icon, no memory. Switched on, it appears in every window at once. Nothing is downloaded either way.
- Coming here: installing language servers from inside Feather, as VS Code does through its extensions. Until then a server already on the Mac is used (see Languages).
14 · Updates
Automatic, signed, and sometimes required
- Feather checks for a new version once a day, and when you choose Feather ▸ Check for Updates…. A new version shows its release notes with an Install button; Feather downloads the disk image, checks its signature against a key inside the app (so a hacked server cannot push a fake), swaps the app and relaunches with your windows as they were. Settings, sessions and checkpoints live outside the app and are untouched. When automatic updates are allowed, an ordinary update is downloaded quietly and installed at the next quit.
- Required updates. A release that fixes a serious bug can be marked critical. Every older copy then shows it at once with no Skip button, every window carries an Update required card with Install Now until it is installed, and the download starts by itself so Install needs no wait. Feather never quits on its own: you press Install, and your windows come back.
- What’s New. After an update, a page with the release notes opens once. It is always under Help ▸ What’s New in Feather, starts with the running version and a Check for Updates link, and is also linked from the welcome page.
- Where the files are. Each release is published on GitHub Releases as
Feather-<version>.dmgand asFeather.dmg; the Download button on this site uses the permanentreleases/latestlink, so it always fetches the newest version, and the update feed lives on this site.
15 · Settings
Settings, themes and shortcuts
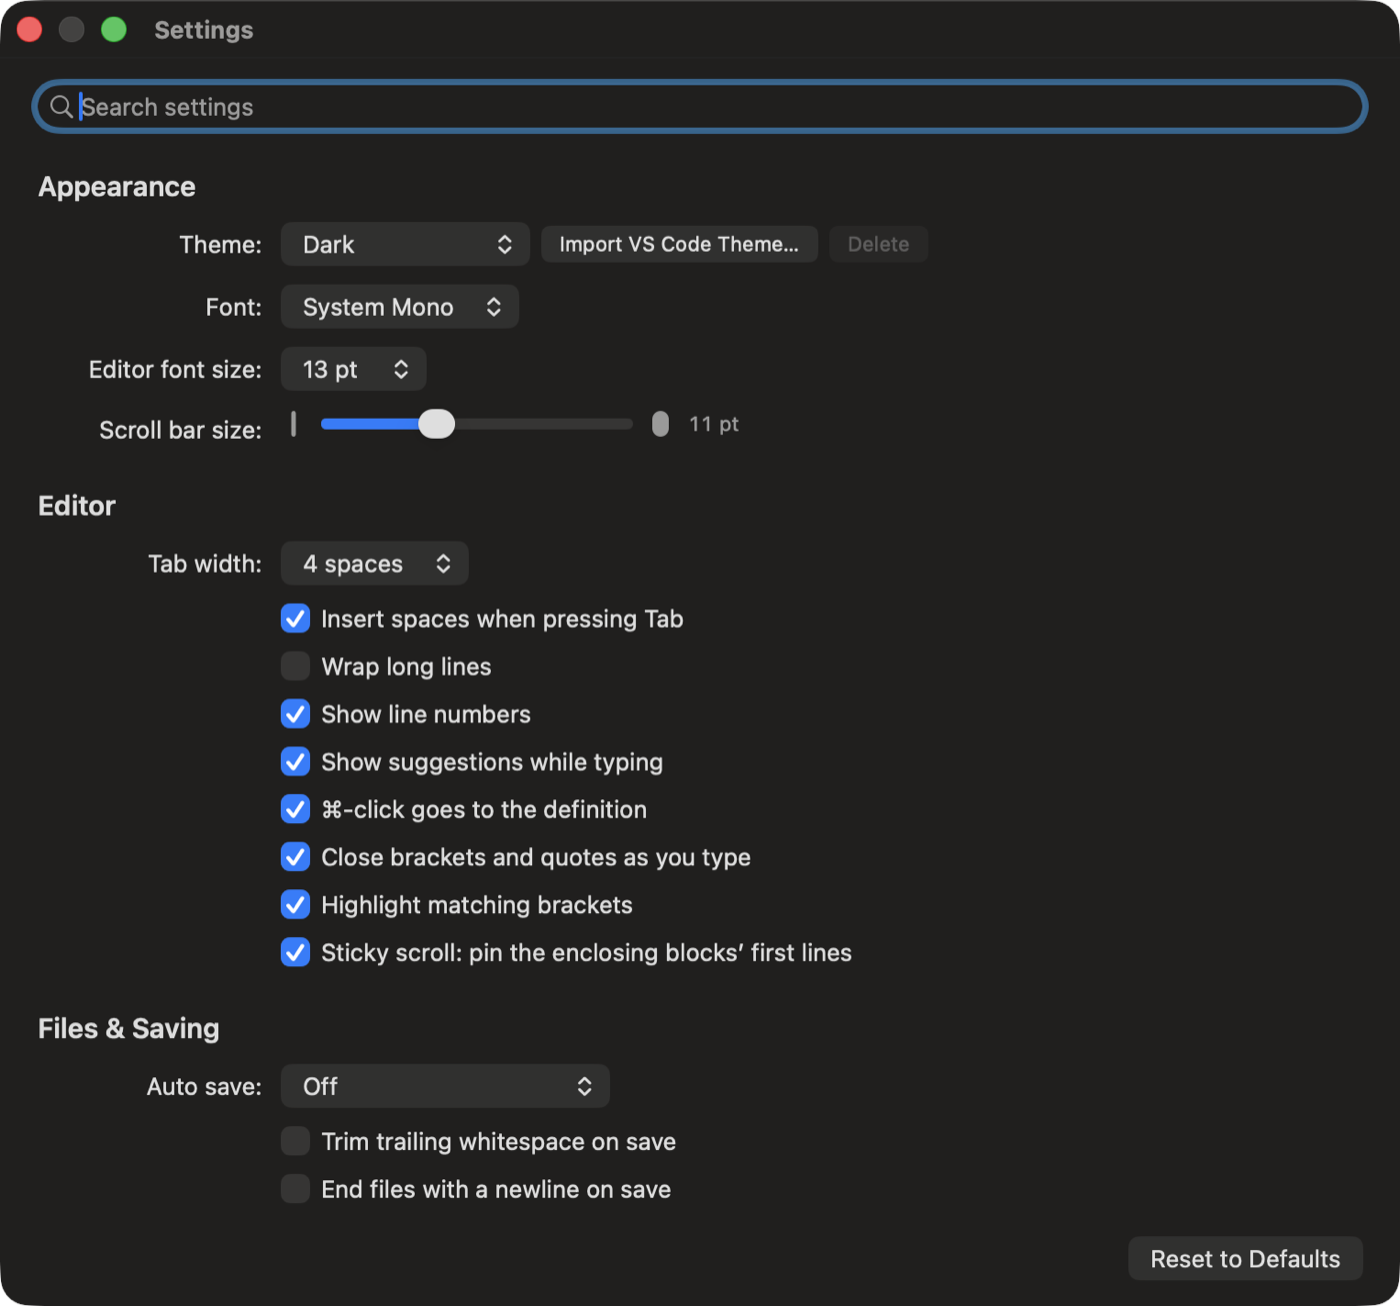
Feather ▸ Settings… (⌘ ,) has a search box and sections like VS Code’s: type “terminal” or “save” and only the matching settings stay. Reset to Defaults is at the bottom. Every switch is also in the Command Palette.
| Section | What is in it |
|---|---|
| Appearance | Theme (Dark, Light, Midnight, Solarized Dark, GitHub Light, and any you import), font, editor font size, scroll bar size. |
| Editor | Tab width, spaces for Tab, wrap long lines, line numbers, suggestions while typing, ⌘-click goes to the definition, close brackets and quotes, highlight matching brackets, sticky scroll. |
| Files & Saving | Auto save (Off, After a Delay, When Focus Changes), trim trailing whitespace on save, end files with a newline, format on save. .editorconfig is honoured in every case. |
| Terminal | Terminal font size, blinking cursor, copy on select, the list’s icon and name colours (or the theme’s), the sound and the notification for a waiting terminal, and how long a quiet terminal waits before it counts as finished. |
| AI Assistant | Which tool Start AI Assistant runs, or your own command. |
| Git | Blame for the current line in the status bar. |
| Preview | Reload the preview when a file changes. |
| General | Reveal the open file in the Explorer, compact folders, glass window chrome, reopen windows, files and terminals on launch, ask before quitting, follow changes, save a checkpoint when a folder is opened, and the Keyboard Shortcuts… editor. |
Themes
Import VS Code Theme… (Settings ▸ Appearance, the Feather menu or the Command Palette) takes any *-color-theme.json file; the theme joins the list and the Command Palette, and can be deleted from Settings again. The theme colour also tints the glass chrome.
Scroll bars
Feather draws its own scroll bars, sized by the slider in Appearance, with no corner piece where a vertical and a sideways bar meet.
Keyboard shortcuts
Help ▸ Keyboard Shortcuts (or Settings ▸ General ▸ Keyboard Shortcuts…) lists every menu command with its keys. Double-click one (or select it and choose Change), press the new keys, then Return. Reset puts one back, Reset All puts them all back, and keys used by two commands are shown in red. The menus pick up the change at once.
Per project
.feather/settings.json in a project carries its colour, its run command and its own tasks; .feather/api carries the API client’s collections and environments. Both are meant to be committed.
16 · Themes and project colour
Themes, imported themes, and a colour per project
Five themes come built in: Dark, Light, Midnight, Solarized Dark and GitHub Light. Pick one in Settings ▸ Appearance or by name in the Command Palette. Import VS Code Theme… adds any VS Code theme from its *-color-theme.json file; it joins the list and can be deleted again. The theme colours the editor, the terminal, the sidebar and the window chrome, and tints the glass on macOS 26.
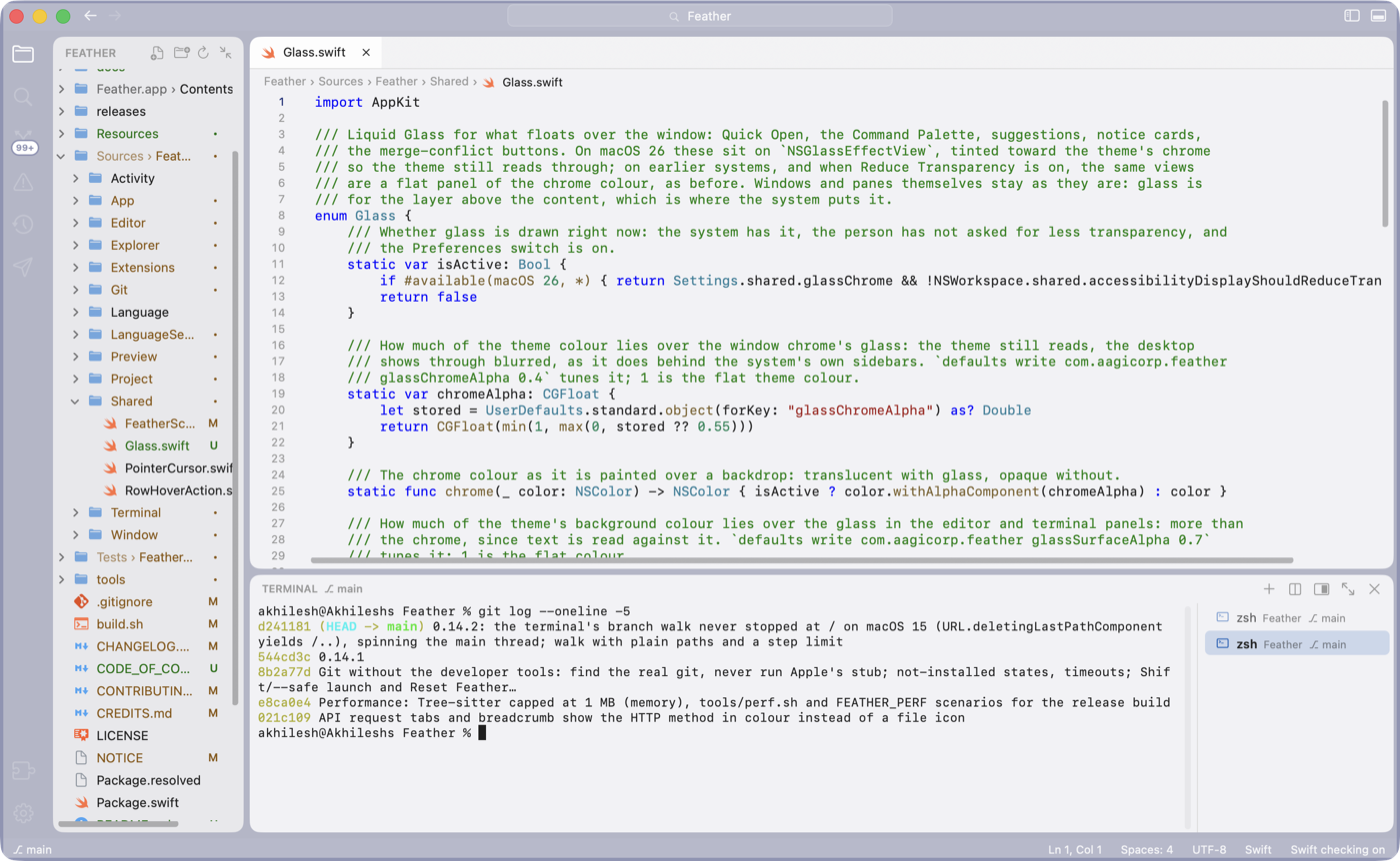
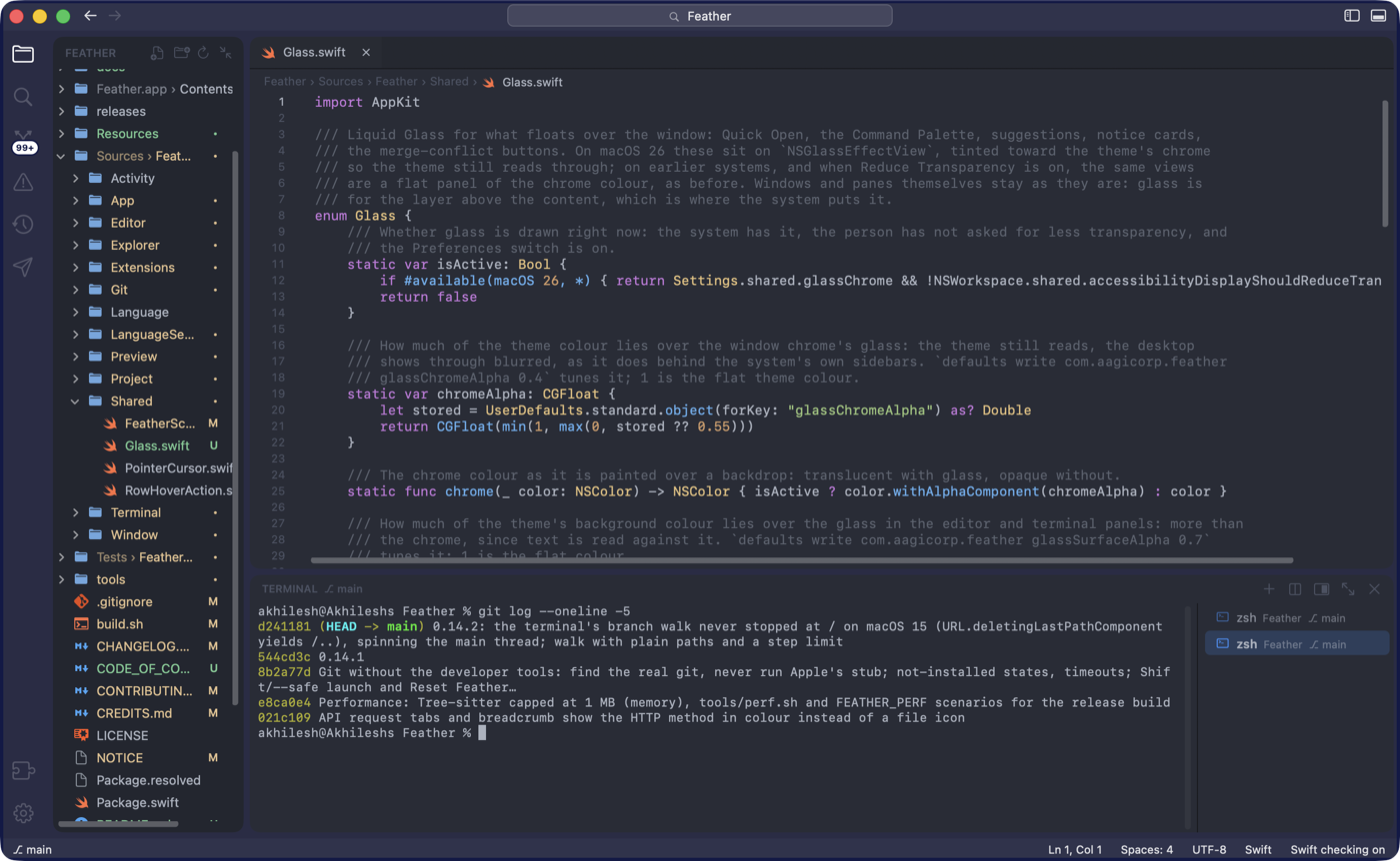
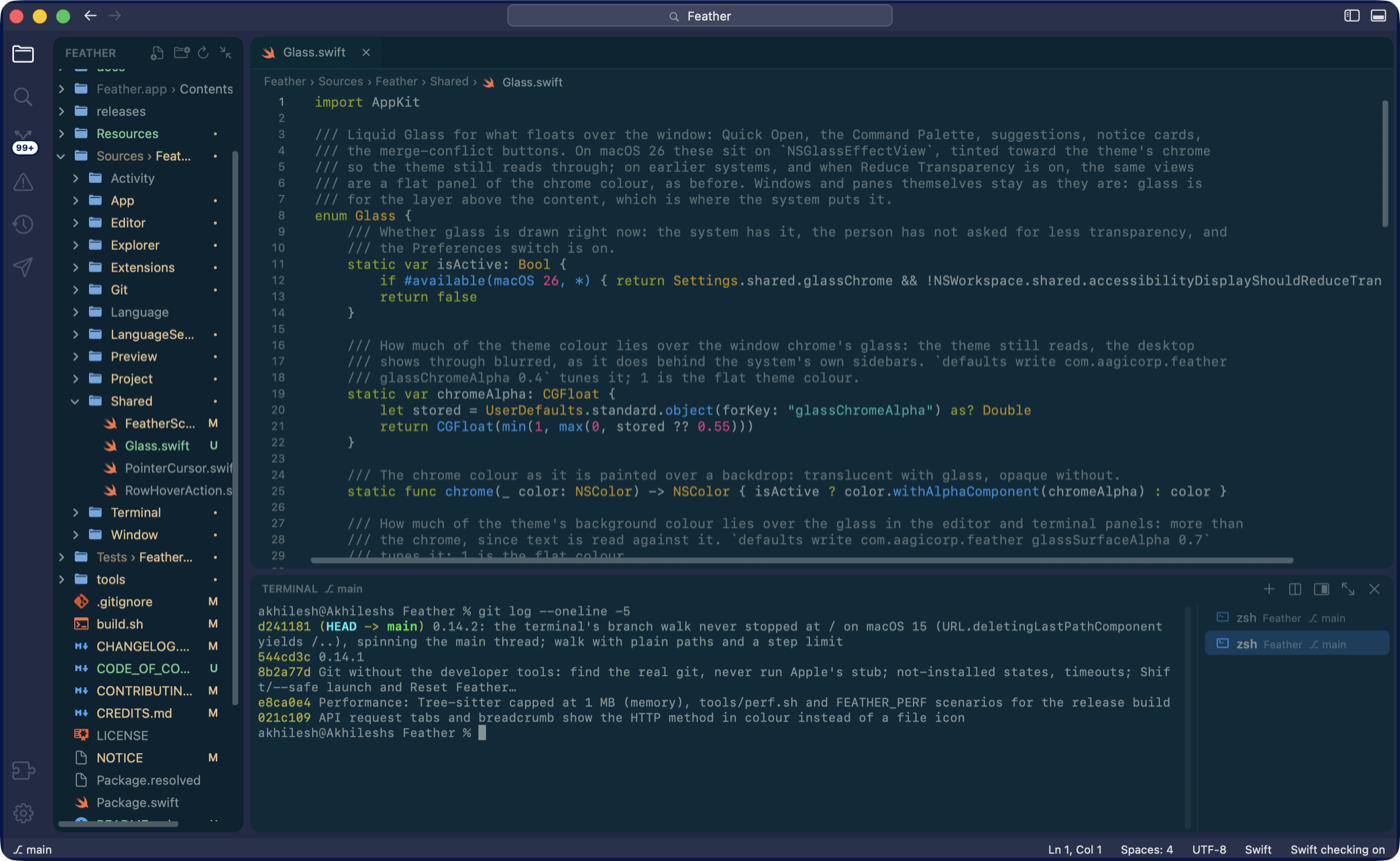
View ▸ Project Color gives one project its own colour, so its windows are told apart at a glance. The colour is dyed into the chrome, not painted over it: the title bar, the status bar, the activity bar and the ground under the sidebar, editor and terminal take the hue, while the panels keep the theme’s background so code reads as before. Pick from the palette, More Colors…, or Use Color from .vscode/settings.json for a colour VS Code’s Peacock extension set; Window Border adds a thin frame in the same colour. The choice is kept in the project’s .feather/settings.json.
17 · Keyboard shortcuts
Every default shortcut
These are the defaults; every one can be changed in Help ▸ Keyboard Shortcuts. ⌃ is Control, ⌥ Option, ⇧ Shift, ⌘ Command.
| Files and windows | Press |
|---|---|
| New File | ⌘N |
| New Window | ⇧⌘N |
| Open… | ⌘O |
| Save | ⌘S |
| Save As… | ⇧⌘S |
| Save All | ⌥⌘S |
| Close Tab | ⌘W |
| Close Other Tabs | ⌥⌘T |
| Reopen Closed Tab | ⇧⌘T |
| Close Window | ⇧⌘W |
| Settings… | ⌘, |
| Minimize | ⌘M |
| Enter Full Screen | ⌃⌘F |
| Finding things | Press |
|---|---|
| Quick Open (files; # symbol, @ symbol in file, : line) | ⌘P |
| Command Palette | ⇧⌘P |
| Find in file | ⌘F |
| Find and Replace in file | ⌥⌘F |
| Find Next / Previous | ⌘G / ⇧⌘G |
| Use Selection for Find | ⌘E |
| Find in Project | ⇧⌘F |
| Replace in Project | ⇧⌘H |
| Go to Symbol in File | ⇧⌘O |
| Go to Symbol in Workspace | ⌘T |
| Go to Line | ⌃G |
| Panes | Press |
|---|---|
| Show or hide the sidebar | ⌘B |
| Explorer | ⇧⌘E |
| Source Control | ⌃⇧G |
| Git Graph | ⌃⇧H |
| Problems | ⇧⌘M |
| Activity: What Changed | ⌃⇧A |
| Review Changes Since Checkpoint | ⌃⇧R |
| Requests (the API pane) | ⌃⇧I |
| Show or hide the terminal | ⌃` or ⌘J |
| Maximize Terminal | ⌃⇧M |
| Editing | Press |
|---|---|
| Toggle Line Comment | ⌘/ |
| Format Document | ⇧⌥F |
| Trigger Completion | ⌃Space |
| Move Line Up / Down | ⌥↑ / ⌥↓ |
| Copy Line Up / Down | ⇧⌥↑ / ⇧⌥↓ |
| Insert Line Below / Above | ⌘↩ / ⇧⌘↩ |
| Delete Line | ⇧⌘K |
| Indent / Outdent Lines | ⌘] / ⌘[ |
| Add Selection to Next Find Match | ⌘D |
| Select All Occurrences | ⇧⌘L |
| Add Cursor Above / Below | ⌥⌘↑ / ⌥⌘↓ |
| Add a cursor anywhere | ⌥-click |
| Fold / Unfold | ⌃⌘[ / ⌃⌘] |
| Fold All / Unfold All | ⌃⇧⌘[ / ⌃⇧⌘] |
| Go to Matching Bracket | ⇧⌘\ |
| Toggle Word Wrap | ⌥Z |
| Increase / Decrease Font Size | ⌘= / ⌘- |
| Code intelligence | Press |
|---|---|
| Go to Definition | F12 or ⌘-click |
| Find References | ⇧F12 |
| Rename Symbol | F2 |
| Show Quick Info | ⌥⌘I |
| Check Project for Errors | ⇧⌘B |
| Ask AI Assistant About Selection | ⌃⌥K |
| Tabs, splits and previews | Press |
|---|---|
| Next / Previous Tab | ⇧⌘] / ⇧⌘[ |
| Next / Previous Tab (also) | ⌃⇥ / ⌃⇧⇥ |
| Split Editor Right | ⌘\ |
| Focus Next Editor Group | ⌥⌘\ |
| Toggle Markdown Preview | ⇧⌘V |
| Open Markdown Preview to the Side | ⌥⌘V |
| Show Preview (running app) | ⌃⌥P |
| Show Preview to the Side | ⌃⌥⇧P |
| New Preview Tab | ⌃⌥N |
| Open App in Browser | ⌃⌥B |
| Back / Forward | ⌃- / ⌃⇧- |
| Terminal and running | Press |
|---|---|
| New Terminal | ⌃⇧` |
| Split Terminal | ⌃⇧5 |
| Next / Previous Terminal | ⌥⌘] / ⌥⌘[ |
| Start AI Assistant | ⌃⌥A |
| Send Selection to Terminal | ⌃⌥S |
| Send File Reference to Terminal | ⌃⌥L |
| Run Task… | ⌥⌘R |
| Rerun Last Task | ⌥⇧⌘R |
| Run Project | ⌘R |
| Run Current File | ⇧⌘R |
| Stop | ⌘. |
| Git | Press |
|---|---|
| Open Changes for Current File | ⌃⇧D |
| Sync Changes (pull, then push) | ⌃⇧S |
| Commit (in the message box) | ⌘↩ |
| Requests | Press |
|---|---|
| Show the API pane | ⌃⇧I |
| New Request | ⌥⇧⌘N |
| Send Request | ⌘↩ |
| Save the request | ⌘S |
| Run Collection or Folder | ⌥⇧⌘R |